

The course Dashboard appears when you first log into CarmenCanvas. There are three different dashboard viewing options. Click the links below for additional information on each dashboard view. This article covers how to navigate and customize the default Card View dashboard.
- Card view (default)
- List view
- Recent Activity view
The Canvas Dashboard is accessible at any time by clicking the Dashboard link in the global navigation. To change your dashboard view, click the Options menu, and select your preferred viewing option.
For a brief overview of navigating the dashboard as a students, see the Canvas Basics video How Do I Use the Dashboard as a Student?.
Customizing the Dashboard
You can customize your Carmen dashboard by setting course favorites and using the course cards to add nicknames, reorder your courses, and customize colors. Expand the sections below for more information.
Set Course Favorites
Setting course favorites allows you to customize the courses you want to show in your Course list.
Once you have selected at least one course as a favorite, only your favorite courses will appear in the Courses list. When no courses are favorited, the courses automatically displays up to 20 courses alphabetically in the drop-down menu.
For all users who have customized their Courses list, Carmen automatically adds all new enrollments as a favorite.
For students, courses are not set as a favorite until the course is published by your instructor. Students cannot favorite unpublished courses.
For instructors, courses are set as a favorite as soon as they are added to the course.
Courses for all roles remain a favorite even if the courses are concluded, but the course can be removed as a favorite at any time in the Courses list.
See the Canvas guides for more information on customizing your course list:
Instructors: How do I customize my Course list as an instructor?
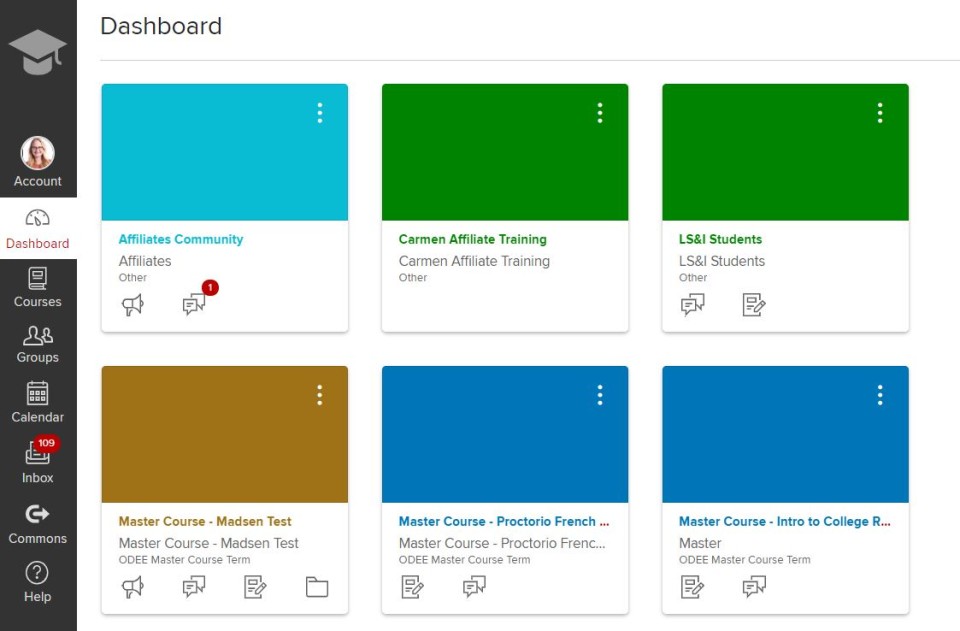
Course Cards
Course cards show an overview of course information including the course name, course code, and the term [1].
Beneath each Course Card there are between one to four icons, which represent the four main features for student course activity:
- Assignments
- Notifications
- Discussions
- Files
For more information on the Course Cards and for further instructions on the tasks listed below see the article How do I view my favorite courses in the Card View Dashboard?
Reorder the Course Cards
You can either manually drag and drop to re-order courses or you can use the Options menu to move the course card to another location on the Dashboard.
Once a dashboard card has been reordered, new courses added to the dashboard always display at the end of all existing courses.
Course Nicknames
Course Nicknames help you organize your Dashboard. Course nicknames appear in the Dashboard, Course Navigation Menu, course breadcrumbs, and notification emails.
A course nickname only changes the name of the course for the individual user who created the nickname. This allows you to identify courses in the way that seems best to you.
Changing Course Color
Course cards can help you organize your courses by customizing the color, which is synced with the color shown for the course in the Calendar.
See the Canvas guides for more information on customizing your course cards:
Instructors: How do I view my favorite courses in the Card View Dashboard as an instructor?
Students: How do I view my favorite courses in the Card View Dashboard as a student?
Course Dashboard Cards (Instructors only)
Instructors can add an image to the course card that displays in the CarmenCanvas Dashboard for all users of the course. Only instructors can enable and load an image to display on the course card; students cannot disable the image.
Use only images that are appropriate for your course and that you have the rights to use. Do not use corporate or team logos, copyrighted images, or other proprietary images. For your convenience, choose from some pre-selected stock images.
For best results:
- Accepted image formats include JPG, JPEG, GIF, and PNG.
- Crop or resize your image to 262 pixels wide by 146 pixels tall.
- Images display by default behind a color overlay in the course card. The overlay color is a personal setting defined individually in the Dashboard. Although the color overlay can be completely removed, the best practice is to use an image that can display well behind a variety of colors.
Once you have selected an image, follow the directions for uploading the image. Be sure to click Update Course Details to save your changes.