A Template in PebblePad is usually a single-page Resource, which does not contain any personal information or content. A Workbook in PebblePad is a binder that contains multiple template pages. You can create workbooks and templates that can then be shared with others. This guide shows you how to access, build, and share workbooks and templates.
Accessing the Workbook or Template Builders within PebblePad
To create a new workbook or template:
- Click on the Burger Menu (3 stacked lines) in the top left corner.
Click Get Creative.
Image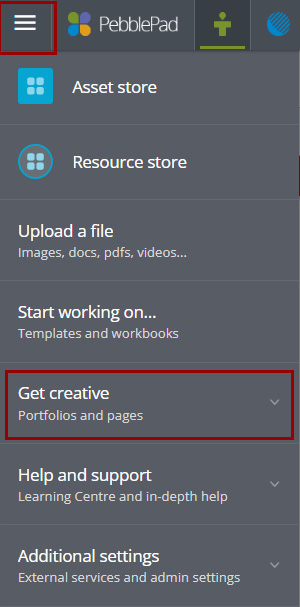
At the bottom of the Get Creative menu, click Create a workbook or Create a template.
Image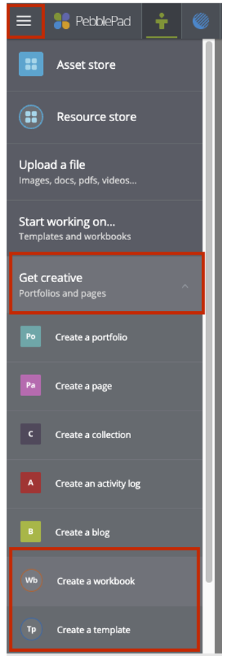
Refer to the following resources for more information on creating PebblePad Templates or Workbooks:
Create a Template
- Log into PebblePad.
- From your PebblePad homepage, click on the Burger menu (3 stacked lines) in the top-left corner to open the menu.
- Click Get creative.
Click Create a template.
Image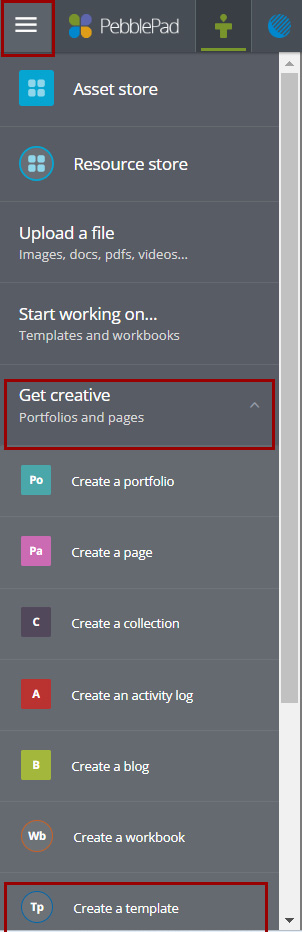
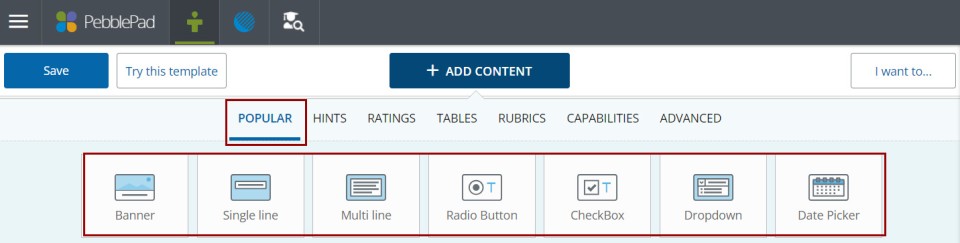
Click the + ADD CONTENT button at the top of the page to add different types of content to your template. For more details about different types of content, refer to the section below.
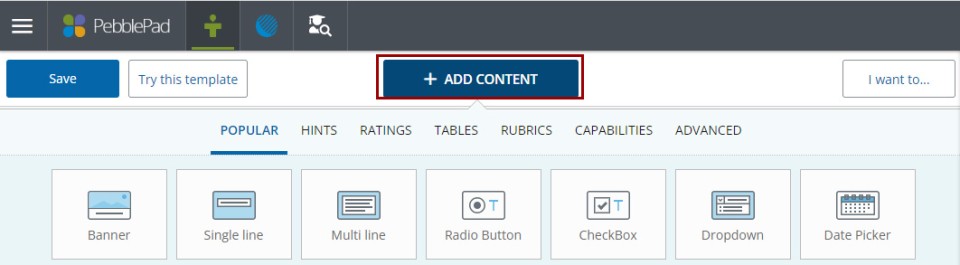
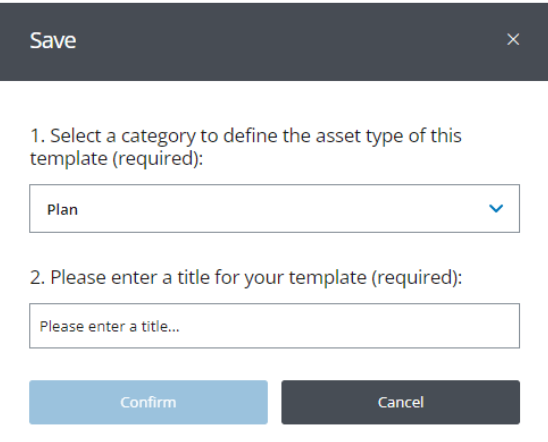
- Once all the necessary content has been added, click Save.
- Select a category from the options in the drop-down menu to assign a category to your template (pick the option matching the template's content as much as possible). Categories are used to help you filter through or search for templates in your Asset or Resource Store.
- Enter a title for the template.
Click Confirm.
- Click on the Burger menu (3 stacked lines) in the top left corner of the page to open the left-side menu.
- Click Resource Store.
- Your newly created template will appear in your Resources list.
Create a Workbook
- Log into PebblePad.
- From your PebblePad homepage, click on the Burger menu (3 stacked lines) in the top-left corner to open the menu.
- Click Get Creative.
Click Create a workbook.
Image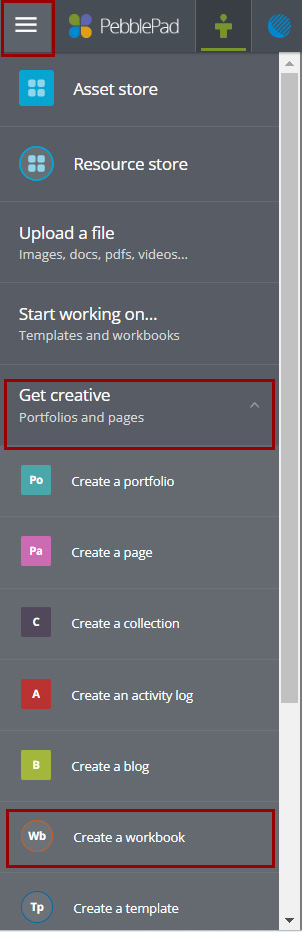
Select from the following options:
- New Template Page
- Existing Resource
- Placeholder Page

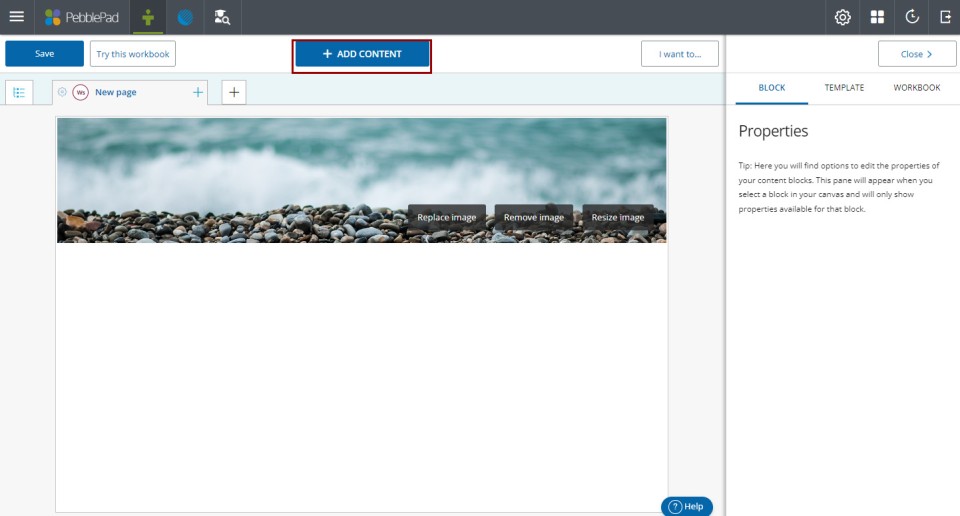
New Template Page
This option allows the author to create new content by clicking or dragging and dropping items in the + Add Content menu (the button displays at the top of the page once the ‘New Template Page’ option is selected).
To add content to the page, click on the blue + Add Content button at the top of the page to reveal the different content options.
Existing Resource
This option allows authors to add a previously created Resource (template or workbook) to the workbook. To add an existing Resource:
- Click on Existing Resource.
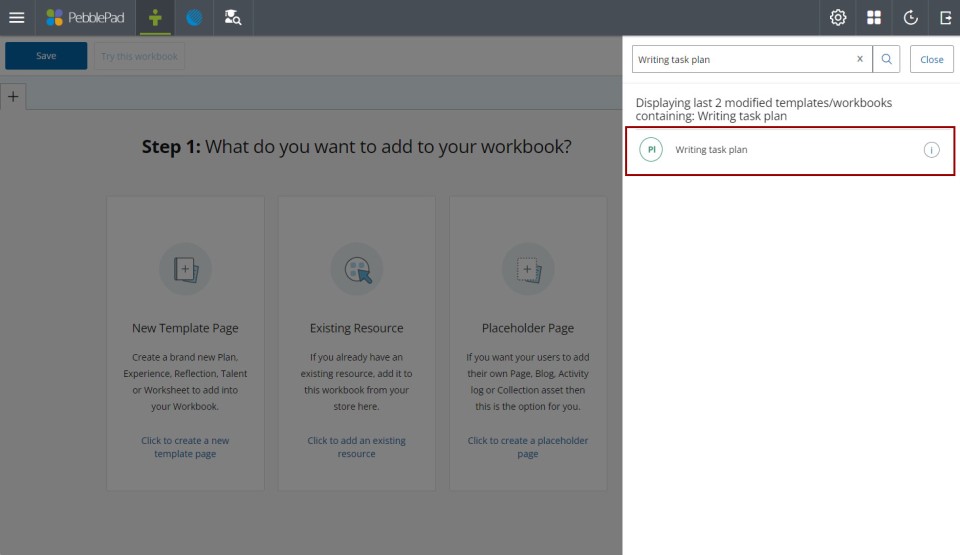
- Search for the Resource you’d like to add.
Click on the title of your Resource to add it to the workbook page.
- You’ll then see the Resource display on the new page.
Placeholder Page
This option allows authors to add a blank page to which users can add their own Assets created in the Get Creative space (Pages, Blogs, Activity logs or Collections). To add a placeholder page:
- Click on Placeholder Page.
- Select from the following options:
- Page: Pages are generally narrative in style and give users the ability to embed media and hyperlinks to supporting material.
- Blog: Blogs contain various media types and posts in (typically) chronological order.
- Activity Log: Activity logs are like blogs, but they contain records of time spent on specified activities. Instructors can either set the criteria for an Activity Log when adding one to a placeholder page including requiring a pre-set template, or they can allow users to define their own criteria for the Activity Log.
Collection: Collections gather Assets that meet criteria set by the author of the Collection. This is done using tags – e.g. Assets with the tag Assessment 1 will all be part of a single collection. Assets can belong to more than one collection. Workbook authors can set the criteria for a Collection when adding one to a placeholder page, or they can allow users to define their own criteria for the Collection.
Image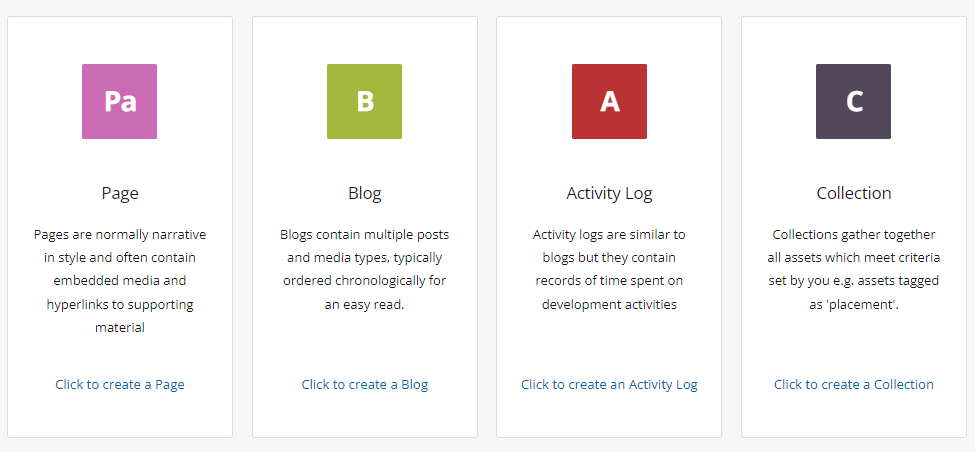
- Once the relevant placeholder has been selected (and criteria entered, if necessary) the placeholder will be added to the page.
- Enter any relevant instructions or hints for the users to see.
Add Content
When adding content to a template or workbook, there are a few types of content blocks that can be added.
Popular
Allows the author to add content that can be filled out/completed by users completing the workbook. Options include:
- Single line textbox
- Multi-line textbox
- Checkbox multi-choice/multi-answer selection
- Dropdown menu
Date Picker
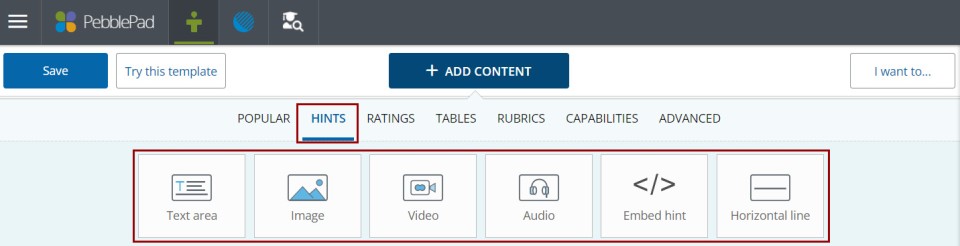
Hints
Allows the author to add content to a page. This content cannot be edited by users completing the workbook. Options include:
- Text Area – authors can add text to the page (users cannot edit this text)
- Image – authors can add an image to the page
- Video – authors can add a video to the page
- Audio – authors can add audio to the page
Horizontal line – adds a horizontal line to the page (this can be dragged and dropped)
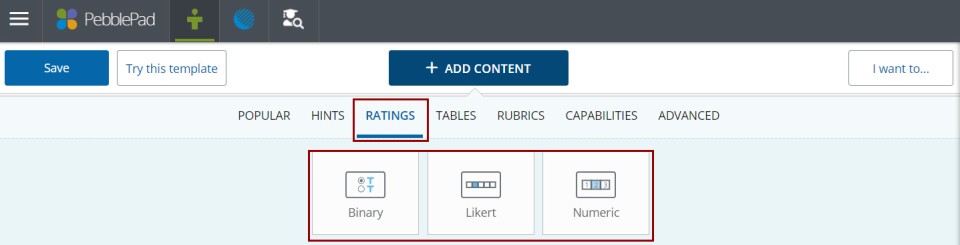
Ratings
Allows the author to add content to a page that users can then use to input a rating. Options include:
- Binary – users can rate the available options using a radio button
- Likert – users can rate the available options using a Likert scale
Numeric – users can rate the available options using a Likert scale with numeric values
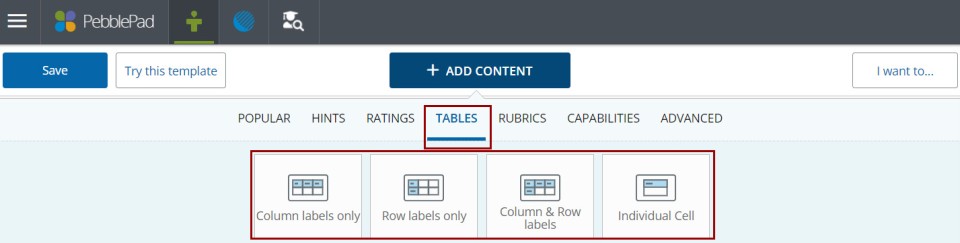
Tables
Allows the author to insert and edit different table formats, which users are then able to fill in. Options include:
- Column labels only – labels may be entered only for columns (no row headers)
- Row labels only – labels may be entered only for rows (no column headers)
- Column & Row labels – labels may be entered for columns and rows
Individual Cell – cells sit apart from one another with a header on each one
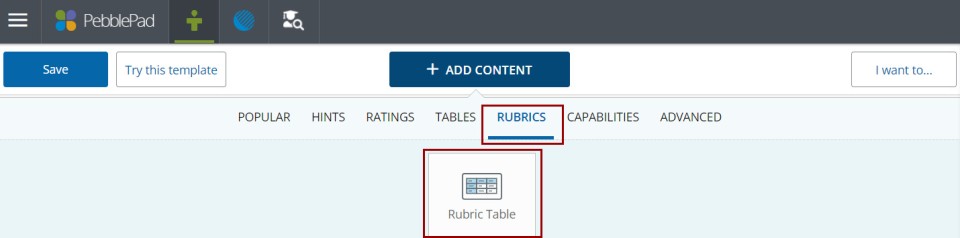
Rubrics
Allows the author to add a Rubric to the page which users are then able to complete.
Rubric Table – labels may be entered for the rows and columns along with assessment criteria. Users can then click on each cell as a method of self-assessment.
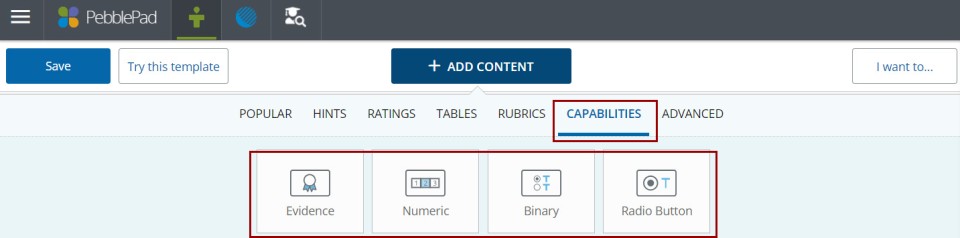
Capabilities
Allows the author to add content items for the purpose of having users submit evidence (from their Asset Stores) for certain assessment types. Capabilities also ask users to submit justifications (or their rationale) for the evidence submitted. Options include:
- Evidence – allows users to submit evidence from their Asset Store
- Numeric – allows users to complete a Likert scale with numeric values and submit evidence from their Asset Store
- Binary – allows users to select from the available options using a radio button and submit evidence from their Asset store
Radio Button - allows users to select from the available options using a radio button and submit evidence from their Asset store
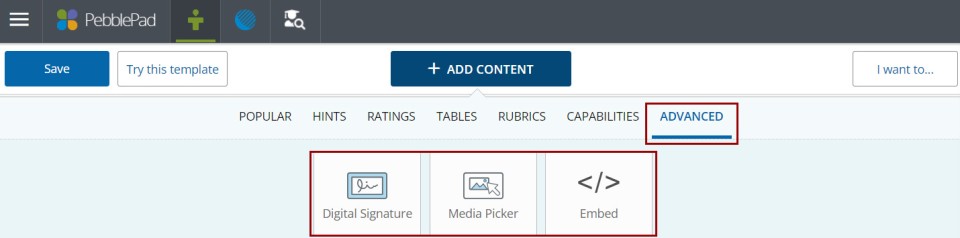
Advanced
Allows the author to add a space for users to enter a signature or add media. Options include:
- Digital Signature – allows users to add a signature to the page
- Media Picker – allows users to upload a media file to the page
Embed – allows users to embed video or other links from supported services
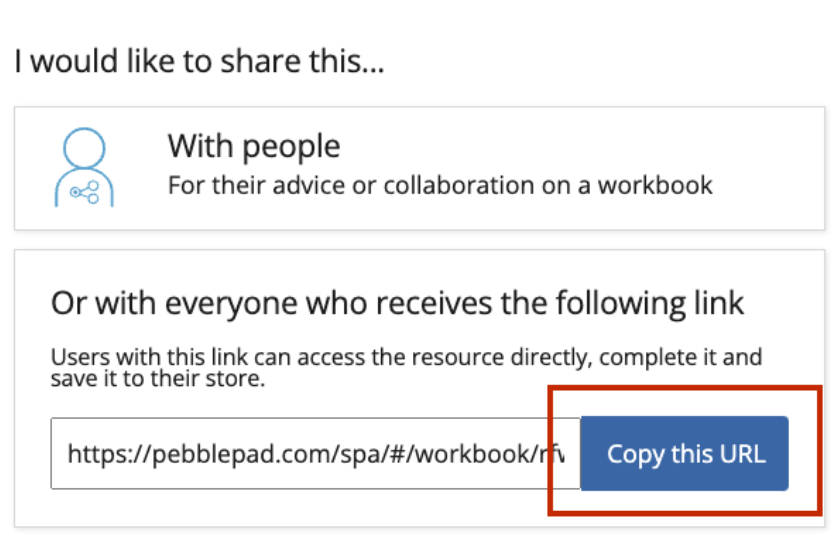
Share a Resource with Students
Workbooks and templates are typically shared using the project’s Share URL option. This option allows students, or anyone with the link and has access to PebblePad, to complete the workbook or template and share the results with you. You should provide instructions on how to share the finished Asset version of the workbook, for example uploading the URL in Carmen.
To share a workbook or template with students or other users to complete, generate a Share URL:
- Click on the I want to… button.
- Click on Share.
Click Copy the URL which allows you to share with anyone with the link.