The Discussions tool is a collaboration area to post, read and reply to messages on different topics, share thoughts about course materials, ask questions, share files, or work with your peers on assignments and homework. Instructors can also set up a graded discussion assignment.
Use the Discussions tool in your course to:
- Encourage users to share thoughts on course material with their peers.
- Set up forums for users to ask questions.
- Post questions for the class to debate.
- Discuss the answers to an assignment.
- Create group discussion boards.
- Summarize student discussion responses with the Discussion Summary tool.
By default, Canvas allows students to:
- Create their own discussions.
- Edit and delete their own posts.
You can change these settings in two ways: from within the Discussions settings or in the Course settings. You can also allow students the ability to attach files to a discussion.
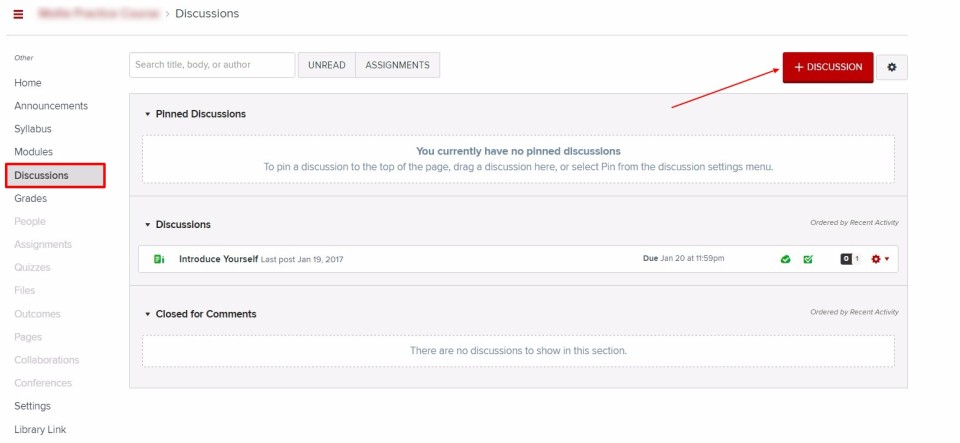
Access Discussions
- Log in to Carmen.
- Enter the desired course.
- Click Discussions.
- Click Add Discussion.
See Organizing Discussions below for more information about Discussion settings.
Organizing Discussions
Discussions can remain open indefinitely, or you can specify a date range (as designated by the available from/until date). Discussions are automatically arranged with the most recently active topics toward the top Users can click the Sort button at the top of any discussion to arrange replies from oldest to newest, or newest to oldest.
When you create a discussion there will be several options to consider:
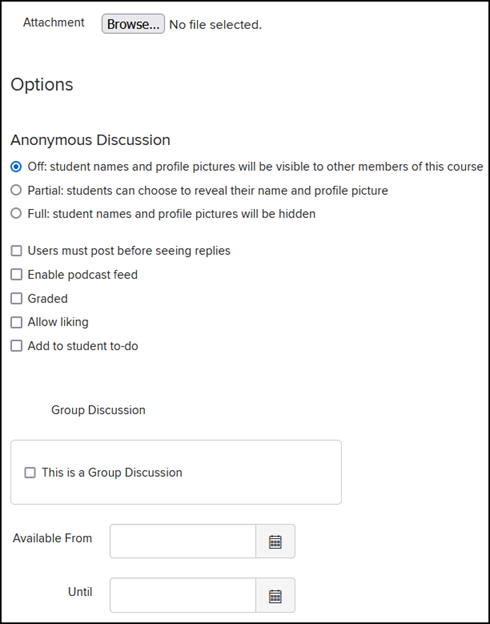
Anonymous Discussions
Fully anonymous discussions hide all student names and profile pictures.
Partially anonymous discussions give each student the option to reply anonymously.
Some users’ replies (from teacher, TA, or designer roles) will never be anonymous even when the discussion settings are set to anonymous.
When a user replies anonymously, no one has access to see who posted content (including the instructor and OTDI Learning Systems staff). If you choose to enable anonymous discussions, set appropriate expectations for students.
Grading and Grouping consideration: When a discussion is set to (fully or partially) anonymous, the discussion cannot be graded. Groups cannot be utilized with anonymous discussions.
To enable a discussion podcast feed, click the Enable podcast feed checkbox.
Graded Discussions
Click the Graded checkbox to create a graded discussion.
Uploading files to discussions can impact file quotas. There is a limit to the amount of file storage each course can use, and a separate limit to the amount of storage each user can use.
If an ungraded discussion requires/encourages students to upload files as part of their reply, these files count against the student’s storage quota.
If the discussion is a graded discussion, these files don’t count toward the student’s (or course’s) storage quota. Essentially, marking the discussion as graded treats any file uploads like an assignment submission, which doesn’t count against any storage limits.
Pro tip: If you want to take advantage of this storage workaround but don’t want to include the discussion in the graded points or have to grade the discussion, you can set the discussion to be worth zero points.
Even if the discussion is marked as graded, the file upload does briefly spend time in the user’s personal files area, so uploading large files (and/or students who have already uploaded enough files to get close to their storage limit) may create issues.
To share large files, any user can upload files to their OneDrive account and share a OneDrive link in the discussion.
Assigning Graded Discussions
You can assign graded discussions to individual students, course sections, or course groups. Once a graded discussion is published it shows up on your Assignments page and creates a column in the gradebook. Graded discussions have an additional set of options that include assigning point values, adding the discussion to an assignment group, enabling peer review, and assigning varied due dates for different students or sections within your course.
Click the Allow liking checkbox to allow students to like discussion replies.
Check the Add to student to-do checkbox to include the discussion on the student To-Do list. If the discussion is graded, the discussion will automatically be included in the To-Do list, so this checkbox is only applicable to non-graded discussions.
Click the This is a Group Discussion checkbox to designate the discussion as a group discussion. You will want to check This is a Group Discussion only if you want to limit it to specifically created subgroups of the course. These subgroups need to be established first. If the whole class is to engage in the discussion, then you do not check this box.
To make your discussion available on a specific date or during a specific date range, enter the dates in the Available From and Until fields, or click the calendar icons to select dates. Note that these fields only apply for non-graded discussions; If you create a graded discussion, these date fields do not apply. If left blank, students will have access for the entire course.
Pinned DIscussions
Pinned discussions are those that you want your students to see at the top of their page. You can arrange pinned discussions in any order. Students will only see this section heading if there are discussions within this section.
Pinned discussions could include short-run discussions, discussions that only run for a single week, and any other discussions that students should specifically pay attention to.
Closed for Comments
These discussions have been manually closed for comments or the discussion is past the available from/until date. These are discussions available in a read-only state.
Closed for comments discussions are also ordered by most recent activity. Students will always see this section heading, even if there are no discussions within this section.
To learn more about each of these discussion types see How do I use the Discussions Index Page?
Managing Discussions
Flexible Viewing Options: View Split Screen keeps the original reply in view (on left side) while you scroll through the additional replies (on right side). Split screen is especially helpful when there are multiple replies to an original reply. Click the “View Split Screen” button at the top of the page to toggle between Split Screen and the classic Inline view.
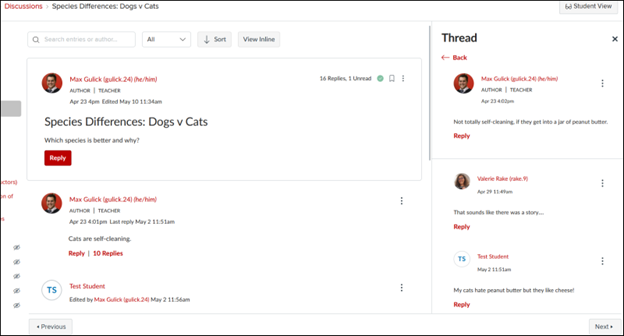
Mention users: Address replies to specific users by mentioning other users in a reply. Type the @ symbol and select a user from the drop-down menu. Only users in the course will display as options for mentions.
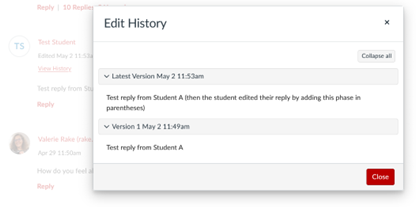
Edit History: View the different iterations of student replies. If a student has edited a reply, the “View History” link will appear under their name.
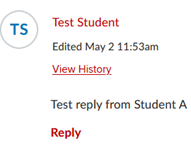
Click Expand All on the pop-up box to view the content of each edit.
Deleted Replies: If a student (or instructor) has deleted a reply, only the phrase “Deleted by [user’s name]” and a timestamp will appear. It is not possible to see the reply that was deleted.
Instructors can edit student replies by clicking the three dots on the right side of the reply and clicking “Edit.” All versions of the reply will be visible to the instructor and the student via the “View History” link.
Get notified when a student reports a reply: To help ensure a safe online environment, Canvas allows students to “report” replies that they feel are inappropriate or offensive. This feature is enabled by default but can be disabled on a course-by-course basis from the Settings menu on the main Discussions page.
If this feature is enabled, a response that has been reported will have a small icon visible only to instructional staff. Hovering over the icon will provide more detail. Reported replies are also sent to the instructor to review.
The feature does not reveal the identity of the student who reported a response. After reviewing the post in context, the instructor can choose to edit or delete the report or take other steps to moderate the discussion.
Tools for managing conflict in classroom discussions: If emotionally charged arguments or other types of challenging conflicts arise in a Carmen discussion, consider the Drake Institute’s resources to help instructors navigate conflict.
Grading Discussions in Speedgrader
When in Speedgrader, the discussion viewing window will automatically move to the selected student's posts and highlight all of the posts by that student with a blue background.
On the right side by the boxes for inputting points, you can click the "next reply" button to scroll your screen to the student's next post/reply on the discussion board.
You can also use your browser’s search bar (CTRL + F on a Windows keyboard, or Command + F on a Mac keyboard) to bring up the Find box in the bottom left corner, and type the student's name in there, then use the little arrows in that Find search bar to skip from entry to entry for the same student.
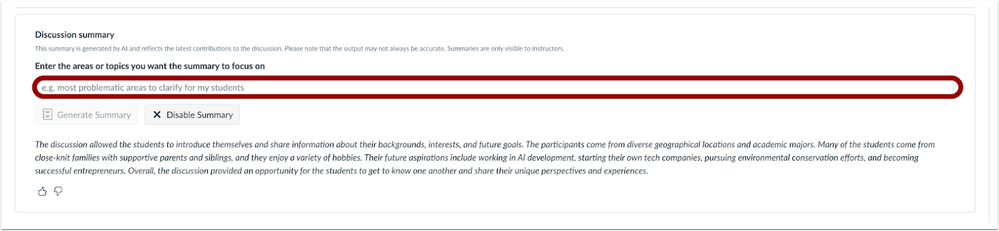
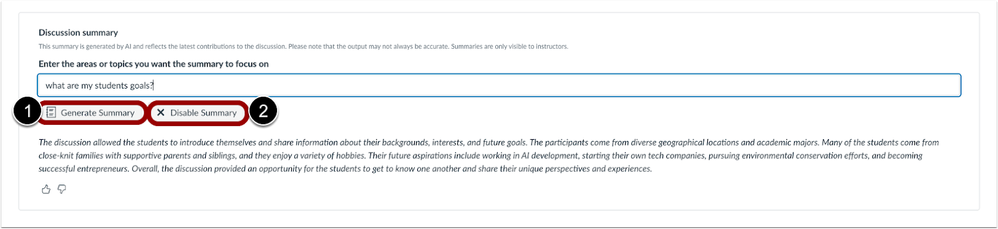
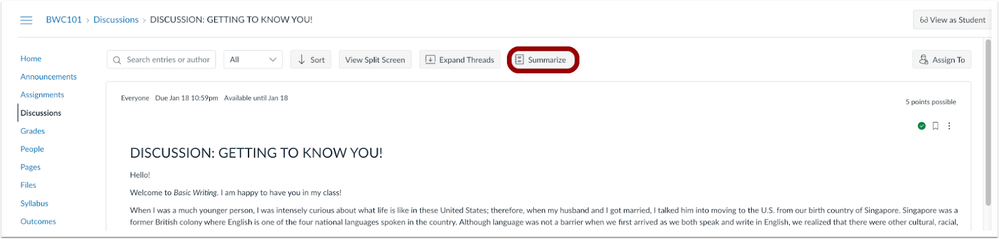
Discussion Summary
The Discussion Summary feature can be used by instructors, TAs, and graders to quickly summarize students’ submissions to Discussions.
Discussion Summary is a feature that will need to be enabled by the instructor of a course before it can be used. This can be done by going into your Course Settings and then clicking the “Feature Options” tab. Then, click the X next to the Discussion Summary option, turning it to a check mark.
Using Discussion Summary
Click the “Summarize” button at the top of the Discussion, then select the thread you wish to summarize. You can also ask specific questions about the thread's content.
You can summarize sections of a discussion post instead of the entire response. Type or copy-paste the section in question into the search bar under “Discussion Summary”.