

You can copy CarmenCanvas course content (such as Assignments, Modules, Pages, Discussions, and so on) from one Canvas course into another. Canvas refers to the process of copying content from one course to another as Importing.
We suggest using Forum courses for many of your course design needs, and then copying from the Forum course into your academic course shell.
Reasons to Use Forum Courses
A few reasons to use Forum courses are described below.
- If you are designing a new course or making significant changes to your course material, build your new course in a Forum. This lets you get started on your own timetable. Then copy your content into your academic course once it is generated.
- If you need to share content with colleagues who will be teaching the same course, copy your previous course into a Forum course and add your colleagues to the Forum. They can make any changes they need before copying it into their own academic courses.
- If your course includes content that is the same every semester, as well as time-sensitive material needed only for a particular term, put all the content that doesn’t change in a Forum and then copy from the Forum into your academic course shell each semester. This ensures you don’t have irrelevant material from last semester in the course you are currently teaching.
See our guide on Forum Courses for more details.
Options for Importing Course Content
When importing course content, you have the option to import all your course content, or to select specific content to copy. See the options below for further details.
Import an Entire Course
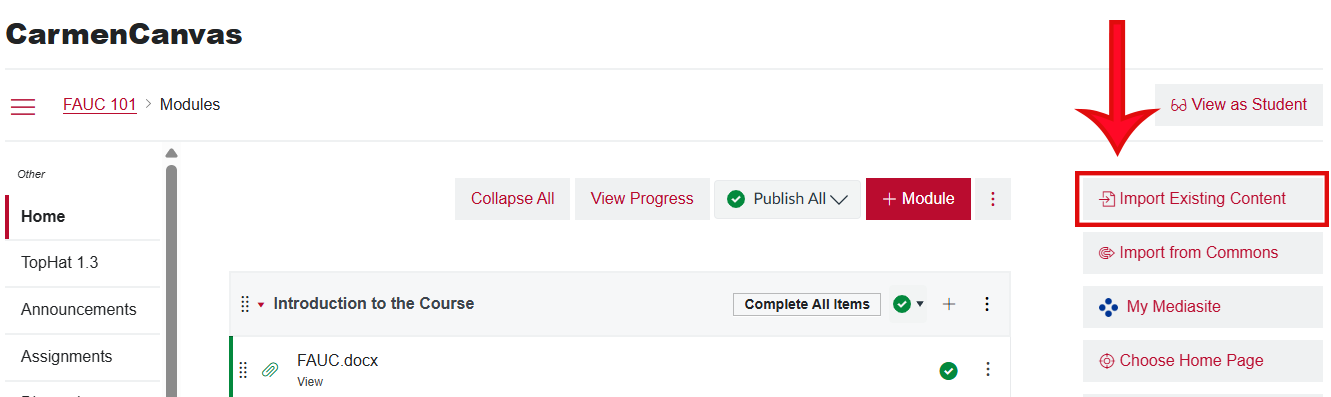
Step 1: To copy content from one course into another, navigate to the homepage of the course where you want content to end up. Then click the Import Existing Content button in the upper right corner of the page. This will open the Import Content page where you can select the course from which you want to copy.
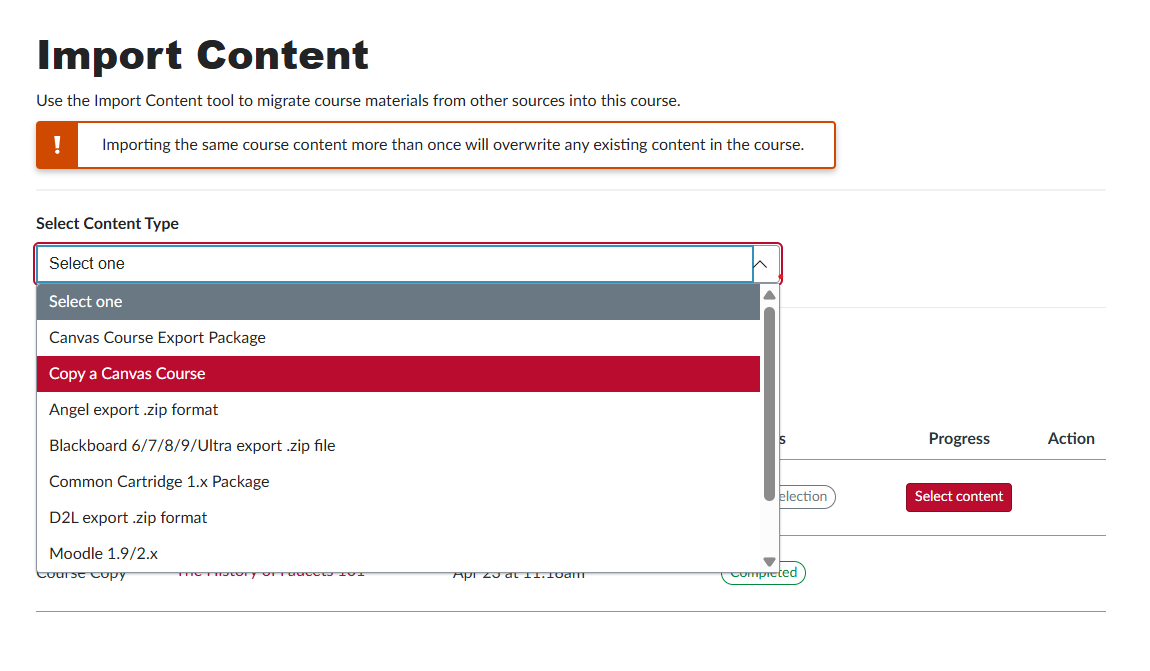
Step 2: From the Select Content Type dropdown menu, select Copy a Canvas Course.
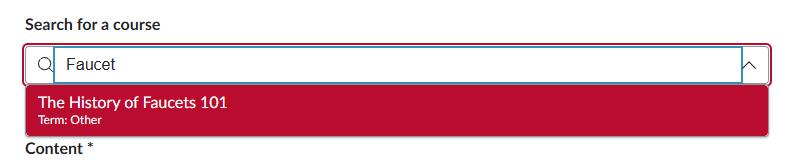
Step 3: In the search field that appears, labeled Search for a course, type the name of the course from which you wish to import content. Then click the course title to select it.
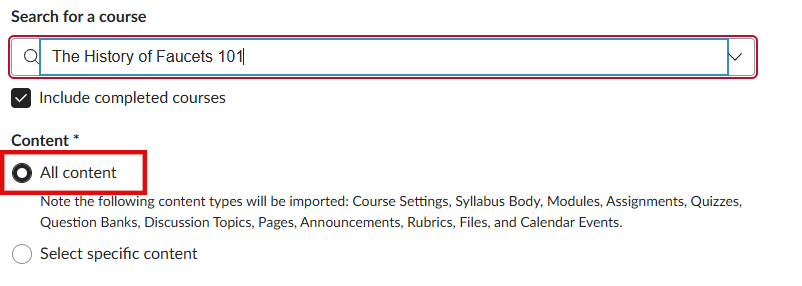
Step 4: Once you’ve chosen a course, you will then select to import all content by clicking the radio button next to the All content option.
Step 5: Decide whether to adjust events and due dates as part of the copy process. We recommend using the Remove dates option. See below for considerations.

Step 6: Once you’re satisfied with your choices, click the +Add to Import Queue button. This will initiate the import.

Once the progress bar has next to the course title in the Import Queue is complete, your content will be ready.
Import Specific Content
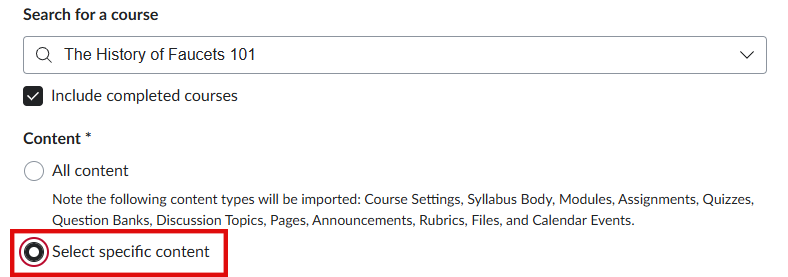
Step 1: If you wish to import specific content to your course, navigate to the homepage of the course where you want the content to end up. Then click the Import Existing Content button in the upper right corner of the page. This will open the Import Content page where you can select the course from which you want to copy.
Step 2: From the Select Content Type dropdown menu, select Copy a Canvas Course.
Step 3: In the search field that appears, labeled Search for a Course, type the name of the course from which you wish to import content. Then click the course title to select it.
Step 4: Once you’ve chosen a course, you will then select the option to import specific content by clicking the radio button next to the Select specific content option.
Step 5: Decide whether to adjust events and due dates as part of the copy process. We recommend using the Remove dates option. See below for considerations.
Step 6: Once you’re satisfied with your choices, click the Add to Import Queue button. This will not initiate the import but will bring up the option to select the items you wish to import.
Step 7: Click the red Select content button. A new menu will open with a list of content to import, including Quizzes, Assignments, Discussions, and more. Select which items you would like to import to your new course, then click the Select Content button.

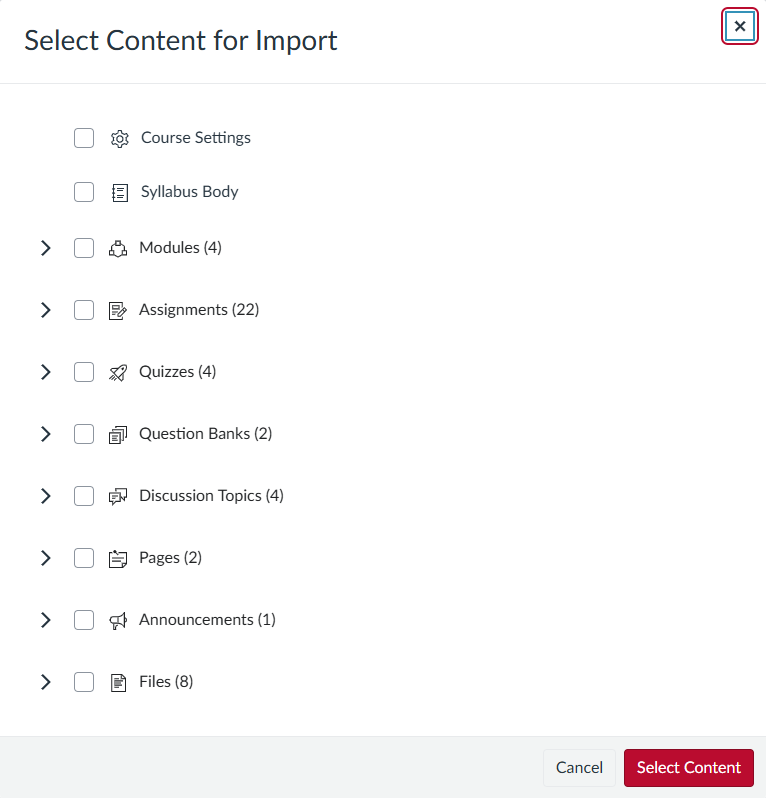
If you are copying pages or quiz items that include images, links to files, or question banks, be sure to select the related items as well. For example, if a Quiz uses questions banks, then you must also import the question banks for the Quiz to function properly. Or if your assignment links to course images or files, you must also import those files or images, or you will need to re-upload them in the new course.
Step 8: Your content will then be added to your Content Imports queue. The progress of your imports can be tracked with the blue progress bar.
Once the process is complete, you will see the imported content in your course.
Updating Dates for Imported Content
We suggest removing dates from assignments when copying from a previous semester course. Availability and due dates from a previous semester can end up locking students out or counting all submissions as late. For example: An assignment originally due March 1st in a Spring semester course will be treated as if all students have failed to submit the assignment if it was imported to your Summer or Fall course without adjusted dates.
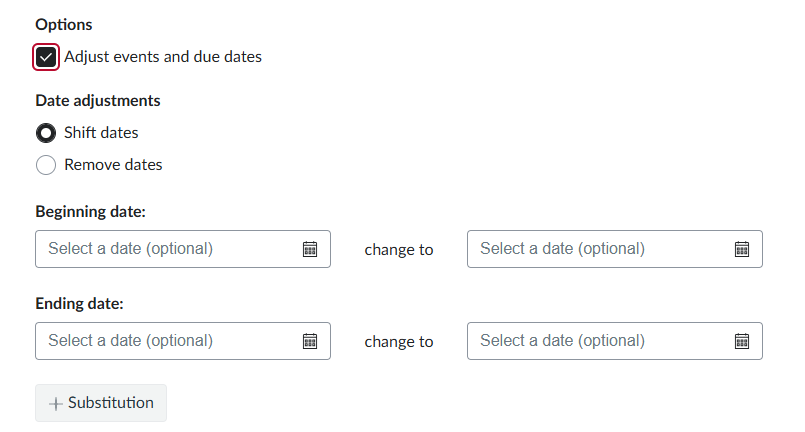
You can use the options to shift dates during course copy by clicking the Adjust events and due dates box. If you do this, review all assignments to ensure the new dates are accurate prior to publishing your course.
Regardless of whether you remove dates or shift them, you can use the Edit Assignments Dates feature to review all assignment dates at once.
To Remove Dates
On the Import Content page, scroll down to Options and select Adjust events and due dates. Then select Remove dates.
Dates will be removed from the following course content:
- Assignments (due dates, availability dates, and peer-review dates)
- Announcements (delayed post dates)
- Quizzes (due dates, availability dates, and show-correct-answers dates)
- Calendar events (start and end dates)
- Modules (unlock dates)
- Files (availability dates)
To Shift Dates
You can adjust the dates on your imported content by calendar date or by day of the week. From the Import Content page, scroll down to Options and click Adjust events and due dates.
- To adjust by calendar date, use the Beginning date: and Ending date: boxes.
- To adjust by day of the week, click the +Substitution button for as many days of the week that you need to shift. Click the “X” to the right of a substitution to delete it.
Read more about adjusting events and due dates.