Teaching and Learning Resource Center

Academic Misconduct: Gathering Results for COAM

As part of the process of submitting a case to the Committee on Academic Misconduct (COAM), you may need to assemble evidence of student activity in CarmenCanvas to support your allegation. The steps below explain how to find various kinds of evidence in Carmen and prepare it for submission.  

Caution

Student Educational Records and Data Security

Information that you pull from Carmen is protected by the Family Educational Rights and Privacy Act (FERPA). Student educational records are considered to be private S3 data, so they should not be downloaded or stored on personal devices.  

When you use university-provided equipment and recommended processes, the data will be properly encrypted throughout the process. We recommend creating a specific folder on your university-supplied computer to store the evidence as you download it. Once the COAM case has concluded, delete your downloaded copies. 

Course Information

Announcements

Open the announcement you want to include as evidence and use your browser’s PrintPage function to create a PDF file.  

  1. For most browsers, you can use the keyboard shortcut Ctrl+P or Command+P to activate the Print function. For many browsers, you can also right-click or control-click to call up the context menu and then select Print 
  2. Change the print method or destination to Save to PDF. Note that “Save to PDF” creates a more accessible file than “Print to PDF.” 
  3. Save the file to your prepared location. 
Course Access Report 

The Access Report provides a list of how many times a student has visited components of your course and the date of their last visit.  It is not a comprehensive statement of student activity, but it provides some insight. 

  1. Go to People or to Grades. 
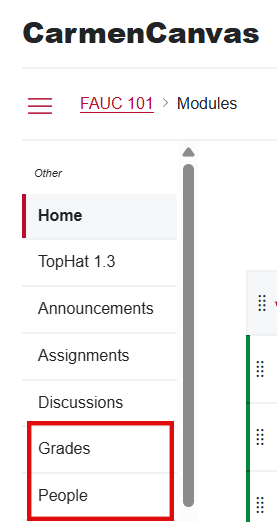
  1. Click on the student’s name. 
  1. Click their name again in the flyout window on the right side of the screen.

    Image
    Student Name Button
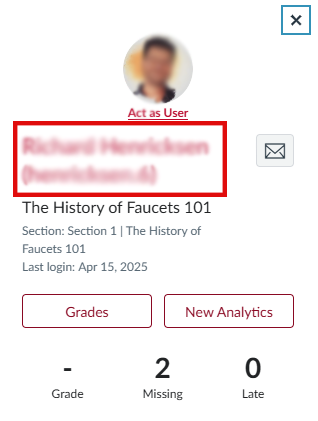
  1. Select Access Report from the More About This User list to the right-hand side of the screen. 
     

    Image
    Access Report Button
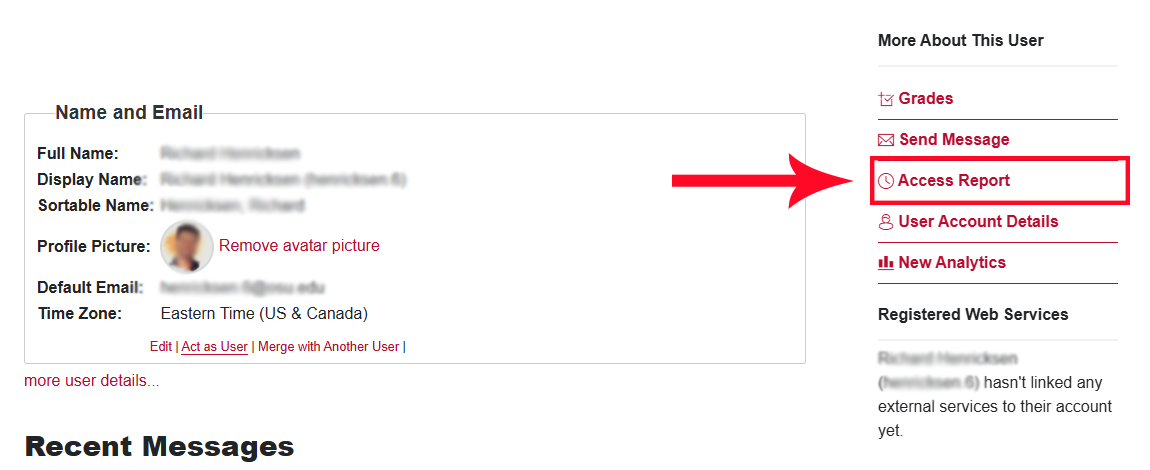
  1. Use your browser’s PrintPage function to create a PDF file for the Access Report.  
    1. For most browsers, you can use the keyboard shortcut Ctrl+P or Command+P to activate the print function. For many browsers, you can also right-click or control-click to call up the context menu and then select Print 
    2. Change the print method or destination to Save to PDF. Note that “Save to PDF” creates a more accessible file than “Print to PDF.” 
    3. Save the file to your prepared location. 
Syllabus

You may need to submit a copy of your course syllabus as it was delivered to students. If there were any changes to the content of the syllabus as announced via Carmen Announcements or Carmen Message, you may need to include those changes as well (see next section).  

If your syllabus is a file you uploaded to Carmen, simply download the file from wherever you posted it. You can also download the syllabus file from the Files button (in the navigation bar on the left). 

If your syllabus is in text form, whether on the Syllabus tab or on a Page within a Module:

  1. Use your browser’s PrintPage function to create a PDF file.  
    1. For most browsers, you can use the keyboard shortcut Ctrl+P or Command+P to activate the Print function. For many browsers, you can also right-click or control-click to call up the context menu and then select Print.
  2. Change the print method or destination to Save to PDF. Note that “Save to PDF” creates a more accessible file than “Print to PDF.” 
  3. Save the file to your prepared location. 

Assignments

Assignment Settings
  1. Go to Assignments and click the name of the assignment. Then click Edit. 
  2. From the assignment’s editing page, use your browser’s PrintPage function to create a PDF file. 
    1. For most browsers, you can use the keyboard shortcut Ctrl+P or Command+P to activate the Print function. For many browsers, you can also right-click or control-click to call up the context menu and then select Print 
    2. Change the print method or destination to Save to PDF. Note that “Save to PDF” creates a more accessible file than “Print to PDF.” 
    3. Save the file to your prepared location. 
  3. Back in Carmen, click Cancel to close out of the assignment’s editing window.
Turnitin Similarity Report 

If you have enabled Turnitin on an assignment, you should evaluate the Similarity Report to see whether any of the highlighted passages need to be reported to COAM. If you had not enabled Turnitin before the assignment was submitted, you can retroactively turn it on and manually submit student submissions. 

Instructions for enabling Turnitin retroactively, evaluating the Similarity Report results, and downloading the report to share with COAM can be found in How to Collect the Turnitin Report. 

Discussions

Discussions Assignment Settings 

If you need to submit evidence of the settings from a Carmen discussion assignment, follow the instructions below.

  1. Go to Assignments/Discussions and click the name of the Discussion assignment.
  1. When on the Discussion assignment page, click the vertical dot menu to the right of the initial post. Select Edit. 
  1. From the Discussion’s editing page, use your browser’s PrintPage function to create a PDF file. 
    1. For most browsers, you can use the keyboard shortcut Ctrl+P or Command+P to activate the Print function. For many browsers, you can also right-click or control-click to call up the context menu and then select Print
    2. Change the print method or destination to Save to PDF. Note that “Save to PDF” creates a more accessible file than “Print to PDF.”
    3. Save the file to your preferred location. 
Discussions Post

Turnitin cannot be enabled on discussions. The screen-printing options described elsewhere in this document may not work with Discussions in Carmen. If you are unable to select the desired sections and print to PDF, you may need to take screenshots from the discussion instead. You can also go to the Speedgrader for the discussion post and view the contributions of the individual student. Take a screenshot of the student’s contributions.

Classic Quizzes

Quizzes Settings
  1. Go to Quizzes and click the name of the quiz to navigate to the Quiz Detail page.
  2. From the Quiz Detail page, use your browser’s PrintPage function to create a PDF file. 
    1. For most browsers, you can use the keyboard shortcut Ctrl+P or Command+P to activate the Print function.  For many browsers, you can also right-click or control-click to call up the context menu and then select Print 
    2. Change the print method or destination to Save to PDF. Note that “Save to PDF” creates a more accessible file than “Print to PDF.” 
    3. Save the file to your prepared location.  
Copy of Quiz/Exam

You may need to submit a copy of the quiz as it was delivered to students.  

  1. Go to Quizzes and click the name of the quiz. 
  1. Click Preview. 
    1. If you have randomized questions, there is no way to preview the exact set of questions that the student you are concerned with received except by looking at the student submission. 
    2. If you have chosen to show only one question per page, you will need to click Next, and print the page again, to repeat this process for each question. 

      Image
      Preview Button
  1. Use your browser’s PrintPage function to create a PDF file. 
    1. For most browsers, you can use the keyboard shortcut Ctrl+P or Command+P to activate the Print function. For many browsers, you can also right-click or control-click to call up the context menu and then select Print 
    2. Change the print method or destination to Save to PDF. Note that “Save to PDF” creates a more accessible file than “Print to PDF.” 
    3. Save the file to your prepared location. 
Copy of Submitted Quiz/Exam

You may need to submit a copy of the quiz as it was submitted by a particular student. 

  1. Go to Quizzes and click the name of the quiz. 
  2. Click Moderate this Quiz. 

    Image
    Moderate this Quiz button
  3. Click the student’s name. 
    1. If you have allowed multiple attempts, the most recent attempt will show by default. Use the links in the right-hand column to view earlier attempts. 

      Image
      View Earlier attempts
  1. Use your browser’s PrintPage function to create a PDF file. 
    1. For most browsers, you can use the keyboard shortcut Ctrl+P or Command+P to activate the Print function. For many browsers, you can also right-click or control-click to call up the context menu and then select Print 
    2. Change the print method or destination to Save to PDF. Note that “Save to PDF” creates a more accessible file than “Print to PDF.”
    3. Save the file to your prepared location.  
Quiz Action Log 

The Action Log shows you the progress of a student through a quiz attempt.  It is not a comprehensive log of the student’s activity within a quiz, but it provides some insight. 

How you get this copy differs depending on whether you are using Classic Quizzes or New Quizzes.  

In Classic Quizzes:  

  1. Go to Quizzes and click the name of the quiz.  
  1. Click Moderate this Quiz 

    Image
    Moderate this Quiz button
  1. Click the student’s name.  
  1. Click View Log.  

    Image
    View Log Button
    1. If you have allowed multiple attempts, the log of the most recent attempt will show by default. Other attempts can be accessed via the numbered links at the top of the page.  

Image
Log session information

  1. Click the red hyperlink for any answered questions to see how many times the question was answered and what those answers were. 

Image
View answers

  1. Use your browser’s PrintPage function to create a PDF file.  
    1. For most browsers, you can use the keyboard shortcut Ctrl+P or Command+P to activate the Print function. For many browsers, you can also right-click or control-click to call up the context menu and then select Print 
    2. Change the print method or destination to Save to PDF. Note that “Save to PDF” creates a more accessible file than “Print to PDF.”
    3. Save the file to your prepared location.  
Honorlock Results 

If you have enabled Honorlock on a quiz, you should review all the results to see whether any of the flags highlight behavior that should be reported to COAM. Instructions for downloading results can be found in Viewing Honorlock Results. 

Quizzes: New Quizzes

Quiz or Exam Settings

New Quizzes has two sets of settings. The first set can be retrieved using the same steps you use for Classic Quizzes (see above).   

To retrieve the second set: 

  1. From the Quizzes page, click the vertical dot menu to the right of the quiz name. Select Build.

    1. Or click on the quiz name and then the build button.
    Image
    Build Button
  2. Click Settings. 

    Image
    Settings Tab
  3. Default browser print settings will print only one page. If you have chosen settings that expand the display beyond one page, you will need to take an additional step to print the whole page. 
    1. Highlight all of the text on the Settings page by using Ctrl+A or by clicking and dragging. Choose an option to print the selected text. How to do this varies by browser. In all cases, you may need to choose the option to “Print Selection.” 
      1. Chrome, Edge or Safari: Ctrl+P or Command+P will bring up the print function set to print all selected text. 
      2. Firefox: Right-click and choose the Print selection option from the context menu. 
    2. Change the print method or destination to Save to PDF. Note that “Save to PDF” creates a more accessible file than “Print to PDF.”
    3. Save the file to your prepared location.  
Copy of Quiz or Exam
  1. From the Quiz Index page, click the vertical dot menu to the right of the quiz name. Select Build. 

    Image
    Build Button
  2. Click on the vertical dot menu next to Return in the upper right corner. 

    Image
    Print New Quizzes Exam
  3. Click Print Blank Quiz or Print Key (With Answers) and choose your print size. 
  4. Click Print Preview. 
  5. Change the print method or destination to Save to PDF. Note that “Save to PDF” creates a more accessible file than “Print to PDF.” 
  6. Save the file to your prepared location. 
Copy of Submitted Quiz or Exam

You may need to submit a copy of the quiz as it was submitted by a particular student. 

  1. From the Quizzes page, click the vertical dot menu to the right of the quiz name. Select Build. 

    Image
    Build Button
  2. Click on Moderate. 

    Image
    Moderate Tab for New Quizzes
  3. Locate the student’s name and click the desired attempt. 
  4. Click Print Results. 
  5. Change the print method or destination to Save to PDF. Note that “Save to PDF” creates a more accessible file than “Print to PDF.” 
  6. Save the file to your prepared location. 
Quiz Action Log

The Action Log shows you the progress of a student through a quiz attempt. It is not a comprehensive log of the student’s activity within a quiz, but it provides some insight. 

  1. From the Quiz Index page, click the vertical dot menu to the right of the quiz name. Select Build. 
  1. Click Moderate. 

Image

  1. Locate the student’s name and click the View Log link to the right of the desired attempt. 

Image
View Log Button

  1. Click the arrow icon next to each step to see details of the student’s activities at that point. 

Image
Arrow Button Highlighted


Image
Multiple choices selected

  1. Default browser print settings will print only 1 page. If the log is longer than one page, you will need to take an additional step to print the whole page. 
    1. Highlight all of the text on the settings page by using Ctrl+A or by clicking and dragging. 
    2. Choose an option to print the selected text. How to do this varies by browser. In all cases, you may need to choose the option to “Print Selection.”
      1. Chrome, Edge or Safari: Ctrl+P or Command+P will bring up the print function set to print all selected text. 
      2. Firefox: Right-click and choose the Print selection option from the context menu. 
Honorlock Results

If you have enabled Honorlock on a quiz, you should review all the results to see whether any of the flags highlight behavior that should be reported to COAM. Instructions for downloading results can be found in Viewing Honorlock Results.