

After students complete an exam that uses Honorlock, we strongly recommend you view the entire recording for each student to ensure that all course policies have been followed during the exam session. The Honorlock flags are tools to help you focus on moments that may need a closer look, but they are not intended as a replacement for instructional staff personally verifying the results.
To view the results
- Click the Honorlock link in your course navigation.
Click on the Results button for the exam you wish to review.
Image
The Exam Results page displays a summary of all the exams taken. For each student you will see the date they took the exam, the time spent on the exam, and a summary of any flags that Honorlock added to the submission.
You can click on the dropdown arrow on the far right of each student’s attempt to see more details about the exam including location, operating system, and other assessment details.
Image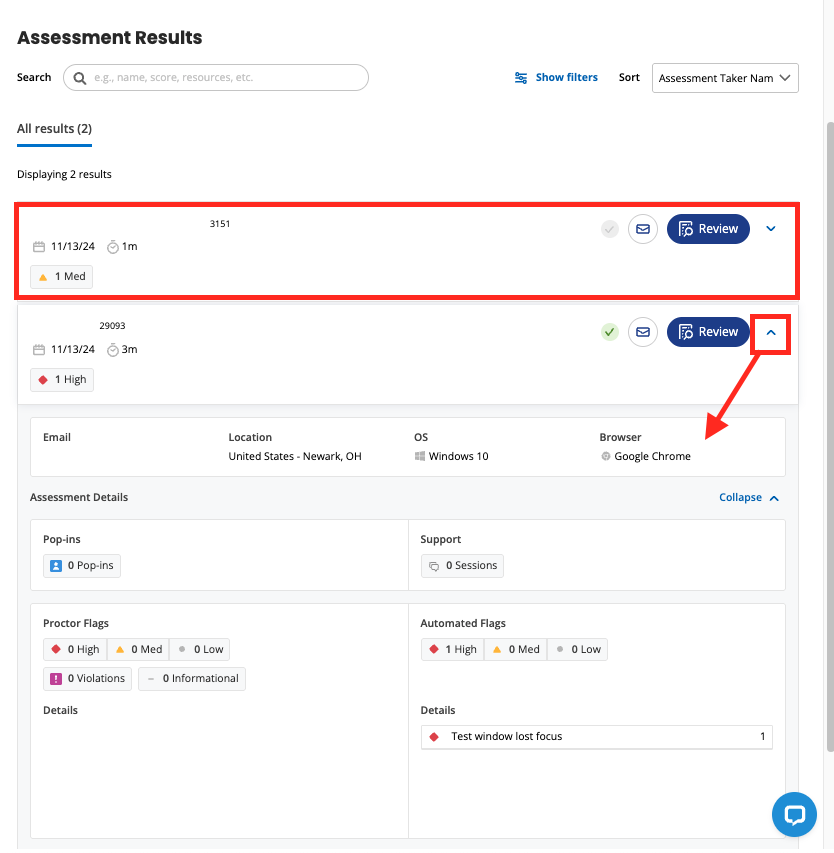
Once you’ve opened a student’s results for review, you will also see a green check mark on the student’s results on the Exam Results page. You can manually change the exam's review status by clicking on the check icon.
Image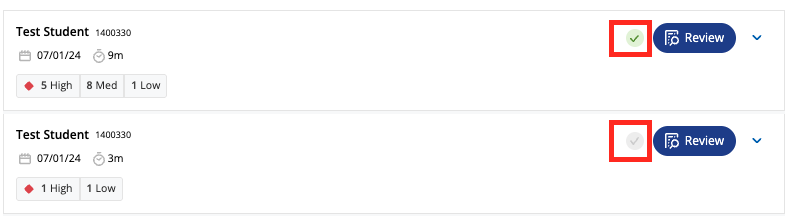
Use the Search field to search for individual students or use the filters to narrow in on the desired results.
Image
Review Individual Student Exam Results
To review an individual student’s exam session results, click the Review button next to the student’s name.

You will be taken to the Exam Session viewer.
You have two options for the layout of the Exam Session Viewer. By default, you will have a stacked-video layout.
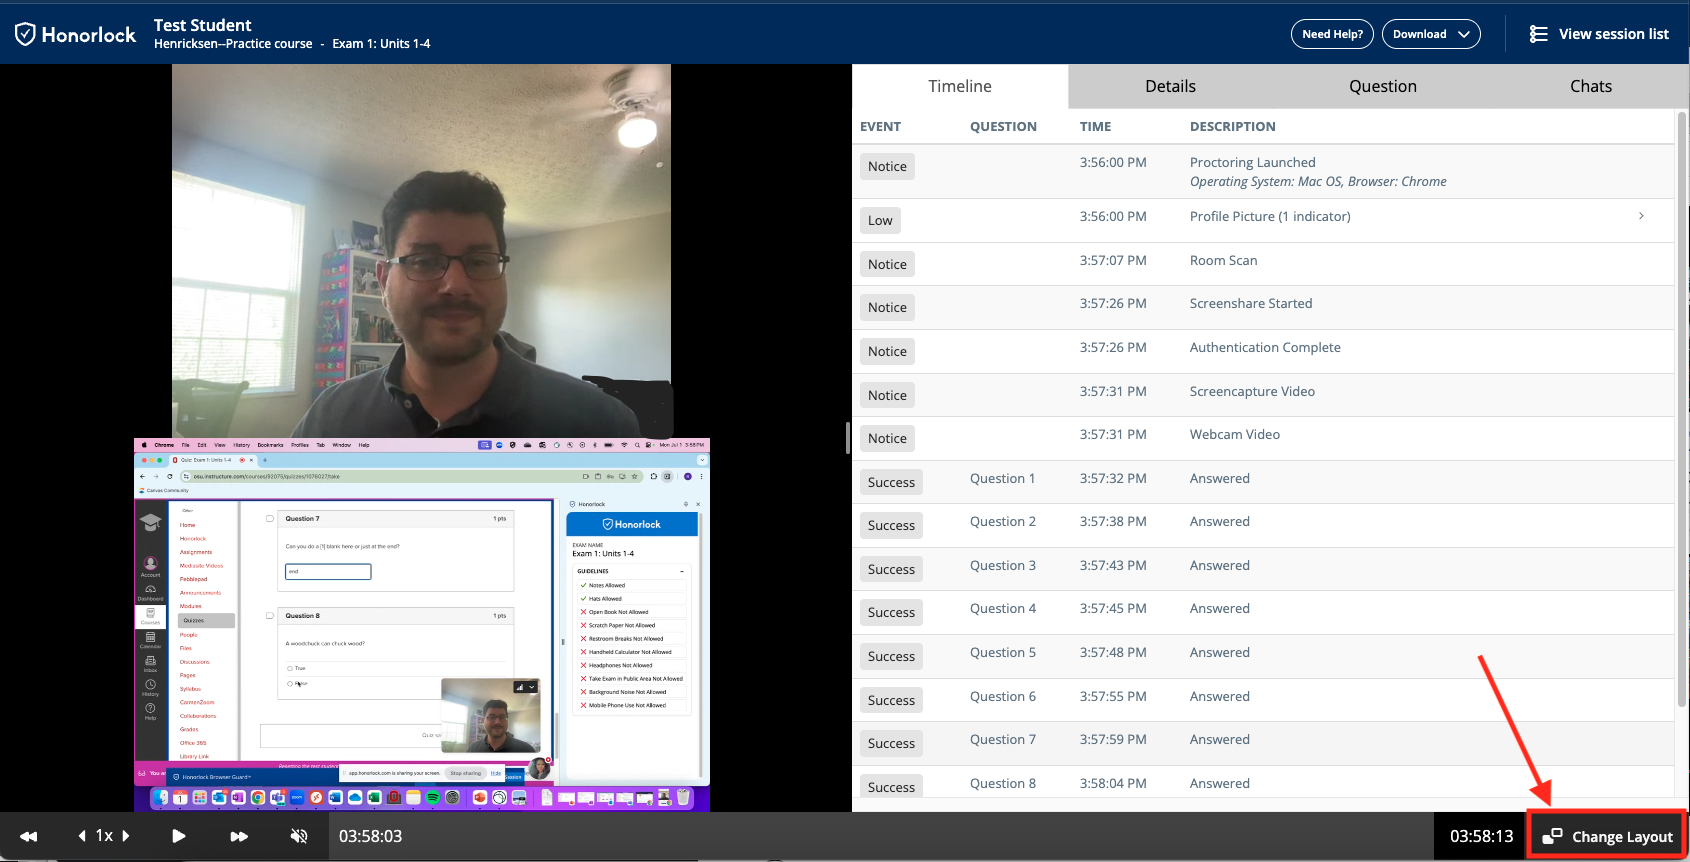
For a side-by-side layout, go to the Change Layout button on the bottom right of the viewer.
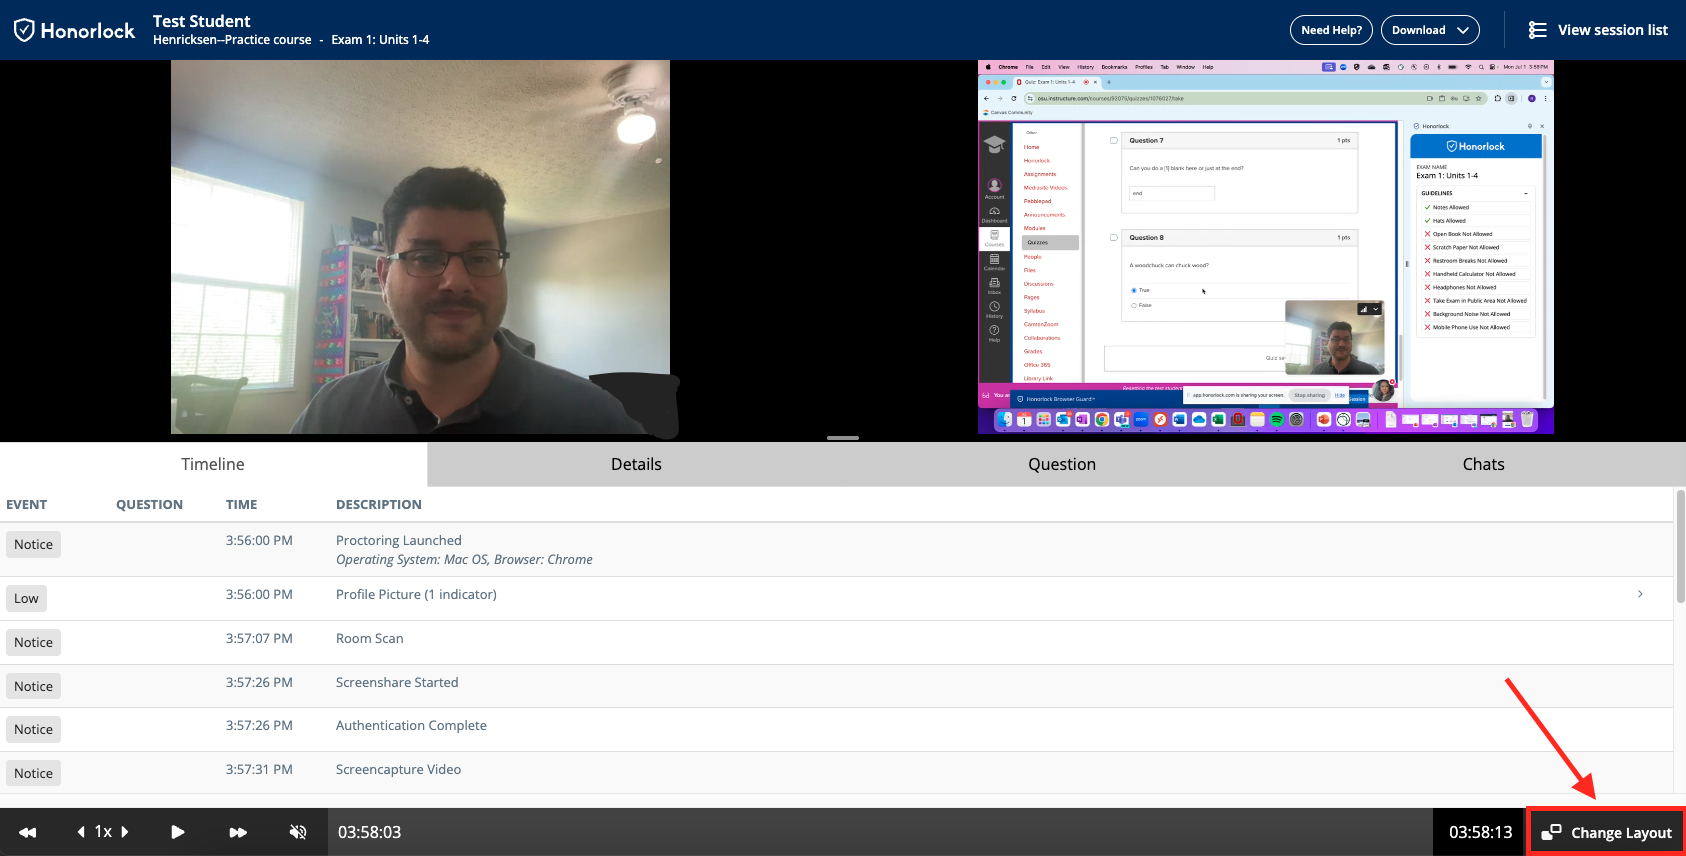
Your layout choice will be remembered the next time you go to review exams.
Regardless of which layout you use, the Exam Session Viewer includes the following:
- The student’s webcam view which allows you to see the student during the exam.
- The student’s screenshare recording allows you to see the student’s screen during the exam. It also allows you to see the room scan and ID scan.
The controls at the bottom of the viewer allow you to do several things with the recording, including navigating through both recordings simultaneously, muting or unmuting the audio, and changing the playback speed of the recording to play at 1x the speed or up to 20x the original speed.
Image
- The Timeline tab is a log that contains the interactions the student had with the exam along with a time stamp and description. This includes any pre-exam checks or authentications, any pop-in warnings issued to the student, questions answered during an exam, and any flags given by the AI-proctoring tool during the exam.
- Each line shows a separate event along with the exam question the student was viewing at that time, any flag, and a brief description.
Clicking on the event will automatically jump to that moment in the exam for both the student webcam and the screen recordings.
Image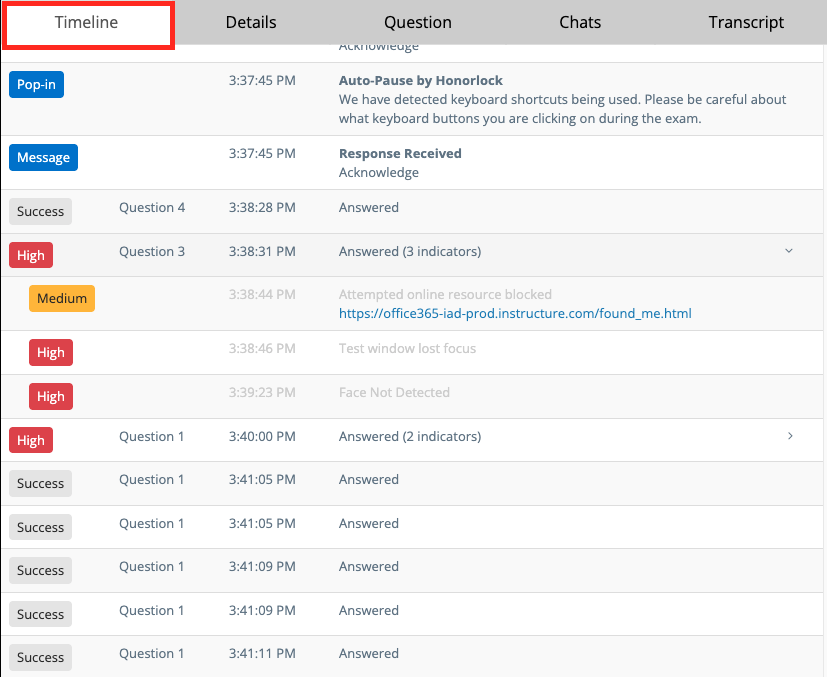
The Details tab allows you to see an overview of the exam guidelines and any additional instructions, so you have them nearby as you review the results.
Image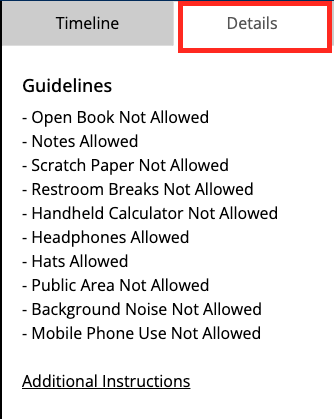
The Questions tab allows you to see which question on the exam the student was working on at any time during the exam. This feature may not show for all question types.
Image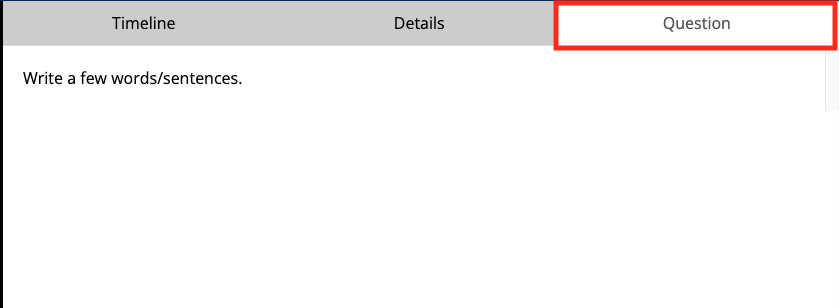
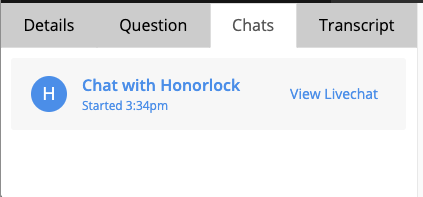
- Depending on the student’s activities during the exam you may be able to see other tabs that allow you to:
- See a multi-device detection occurrence if an external device was detected.
- Review audio-transcripts from the student’s environment.
- Access chat logs conducted during the exam session between the student and Honorlock support.
Navigate Between Exam Sessions
When in the Exam Session Viewer, you can navigate between student exam sessions through the View session list menu on the top right.
Click on the View session list menu.
Image
On the Session List tab, select the exam session you want to review or search for a student’s exam session using the search bar. If you have more than will fit on one page, toggle to other pages at the bottom of the list.
Image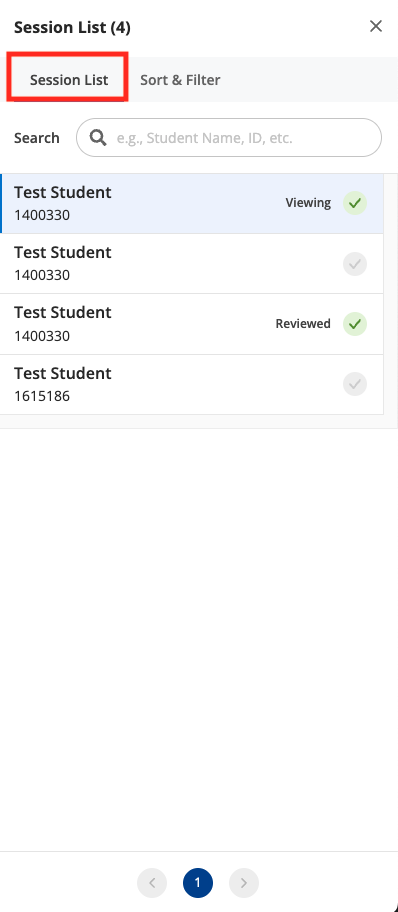
- The exam sessions you have viewed will show a green checkmark and those you have not viewed will not have a green checkmark. You can manually change the viewed status by clicking on the checkmark icon next to the session.
You can also adjust the filters to narrow down into the flags, submissions days, duration of exams, or other filters to target the most pressing concerns you have. Set the filters then hit the Apply button.
Image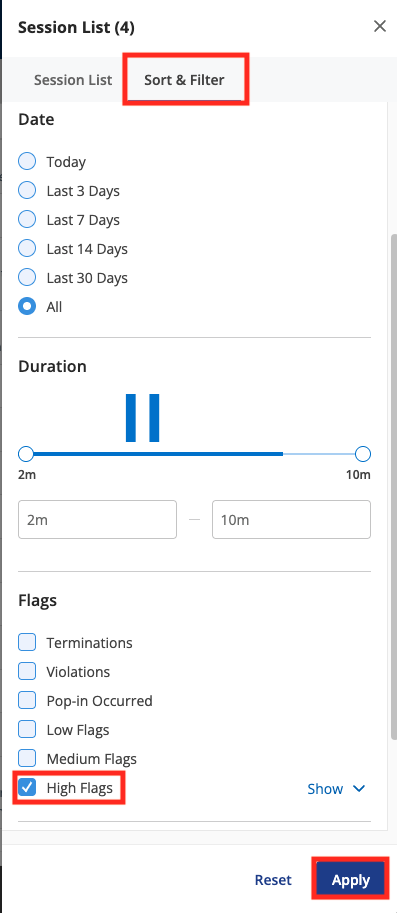
Downloading Exam Results
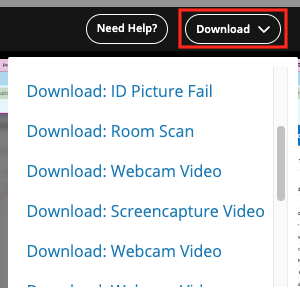
Download exam results through the Download menu on the top right while in the Exam Session Viewer for your student’s exam session. You can download items individually by clicking on the item in the list.
You can also request that the full session be made available. To do so:
- Click the Download button.
Scroll to the bottom and click Request: Full Session. This will take some time and the system will email you once it’s available.
Image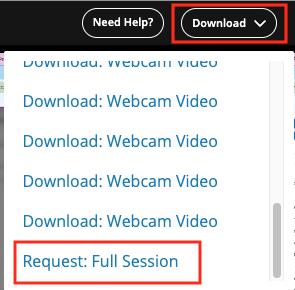
Once available, return to the download list and click Download: Full Session.
Image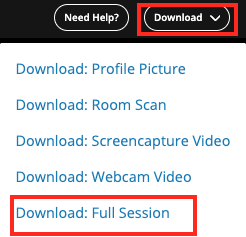
The download will be a zip folder that contains:
- an .html file with the entire session
- mp4s of the room scans, video, and screenshare recordings
- image files of Photo IDs, authentication photo, and any other photos taken to access the exam
If possible, we recommend only downloading the information you need. However, if the entire session is needed, this will download all files for the exam sessions. Be sure to completely delete all files once you have completed your task.
Summary Report
For a summary of the exam-proctoring flags and other exam details, click Summary Report on the top right on the Exam details page.

The summary report shows an overview of the exam information and issues, including the following:
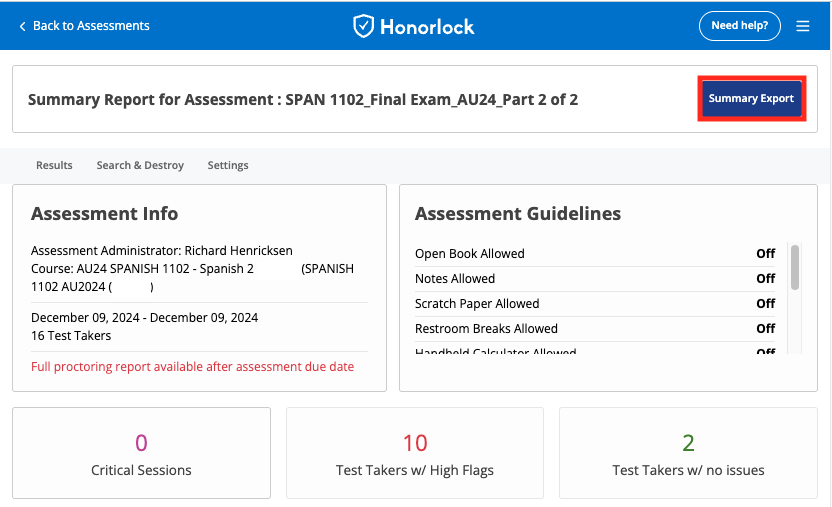
- Assessment Info including Assessment Administrator(s) (instructor(s) name(s)), course name, exam availability window, and number of test takers in course.
- Assessment Guidelines that were set for the exam.
- Critical Sessions.
- This view is not available for Ohio State users and will always show as zero even if students committed serious academic misconduct; Critical Sessions require a live-proctoring feature that Ohio State does not currently use.
- Test Takers w/ High Flags (issues flagged by the AI program)
- Test Takers w/ no issues or sessions without any flags or perceived issues
- A list of students with Critical Sessions and High Flags
- Here you will see a list of the types of violations and the severity level of each. It also provides information on the student’s device and the location where the exam was taken.
Search and Destroy
Included within the exam results area is a Search & Destroy tool. This tool identifies compromised and commonly found questions on the web, and which questions have not been found on the web. It provides you with means to manage how you handle the compromised question and how to make decisions moving forward on future exams. For more information see the Search and Destroy guide.
For additional support, refer to the Reviewing Session Results Best Practices or the How to Interpret Flags vendor resource guides.