

If you are teaching a course where some of your students attend class in-person while others attend remotely through CarmenZoom, this is called concurrent teaching or mixed delivery. Many Ohio State classrooms have technology and resources available to support you in this delivery mode.
The following guide provides general directions on how to project a Zoom meeting to a display in your classroom, how to share an in-room camera or document camera with remote students via Zoom, and the availability of in-room microphones.
This guide references classroom technology available in centrally scheduled classrooms, which are supported by Learning and Collaborative Environments within the Office of Technology and Digital Innovation. You may have access to different technology based on your campus or department. However, many of the suggestions are useful regardless of the specific technology available in your classroom.
If you need assistance using classroom technology, contact the IT Service Desk at 614-688-4357 (HELP) and select option 4 for classroom support.
Projecting Zoom in the classroom
To display your CarmenZoom meeting from the classroom computer, which allows you to project both course content and the students attending remotely to a screen in the classroom, follow these instructions:
- Log on to the classroom computer and start your Zoom meeting.
- On the touch screen controls, select Change Source to ensure the classroom computer is selected (e.g., Podium PC).
- In Zoom, choose a video layout. The Gallery view allows you to display multiple attendees at the same time.
- In Zoom, make sure to update the video, audio, and speaker sources:
- Set the video source to the in-room camera (e.g. AVer CAM520 Pro) by clicking the arrow next to Start Video/Stop Video camera icon
- Set the audio source to the in-room microphone by clicking the arrow next to the Mute/Unmute microphone icon.
- Set the speaker to the in-room speakers (e.g. Crestron) by clicking the arrow next to the Mute/Unmute microphone icon.
- To control what your remote students see, you will need to adjust the camera position in the classroom.
Using an in-room camera in classroom spaces
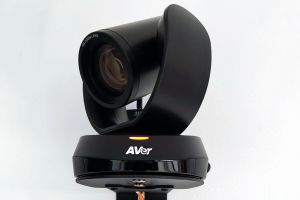
All spaces in the classroom pool have cameras installed in the back of the room to capture a view of the front of the classroom for remote students on CarmenZoom. To adjust the camera:
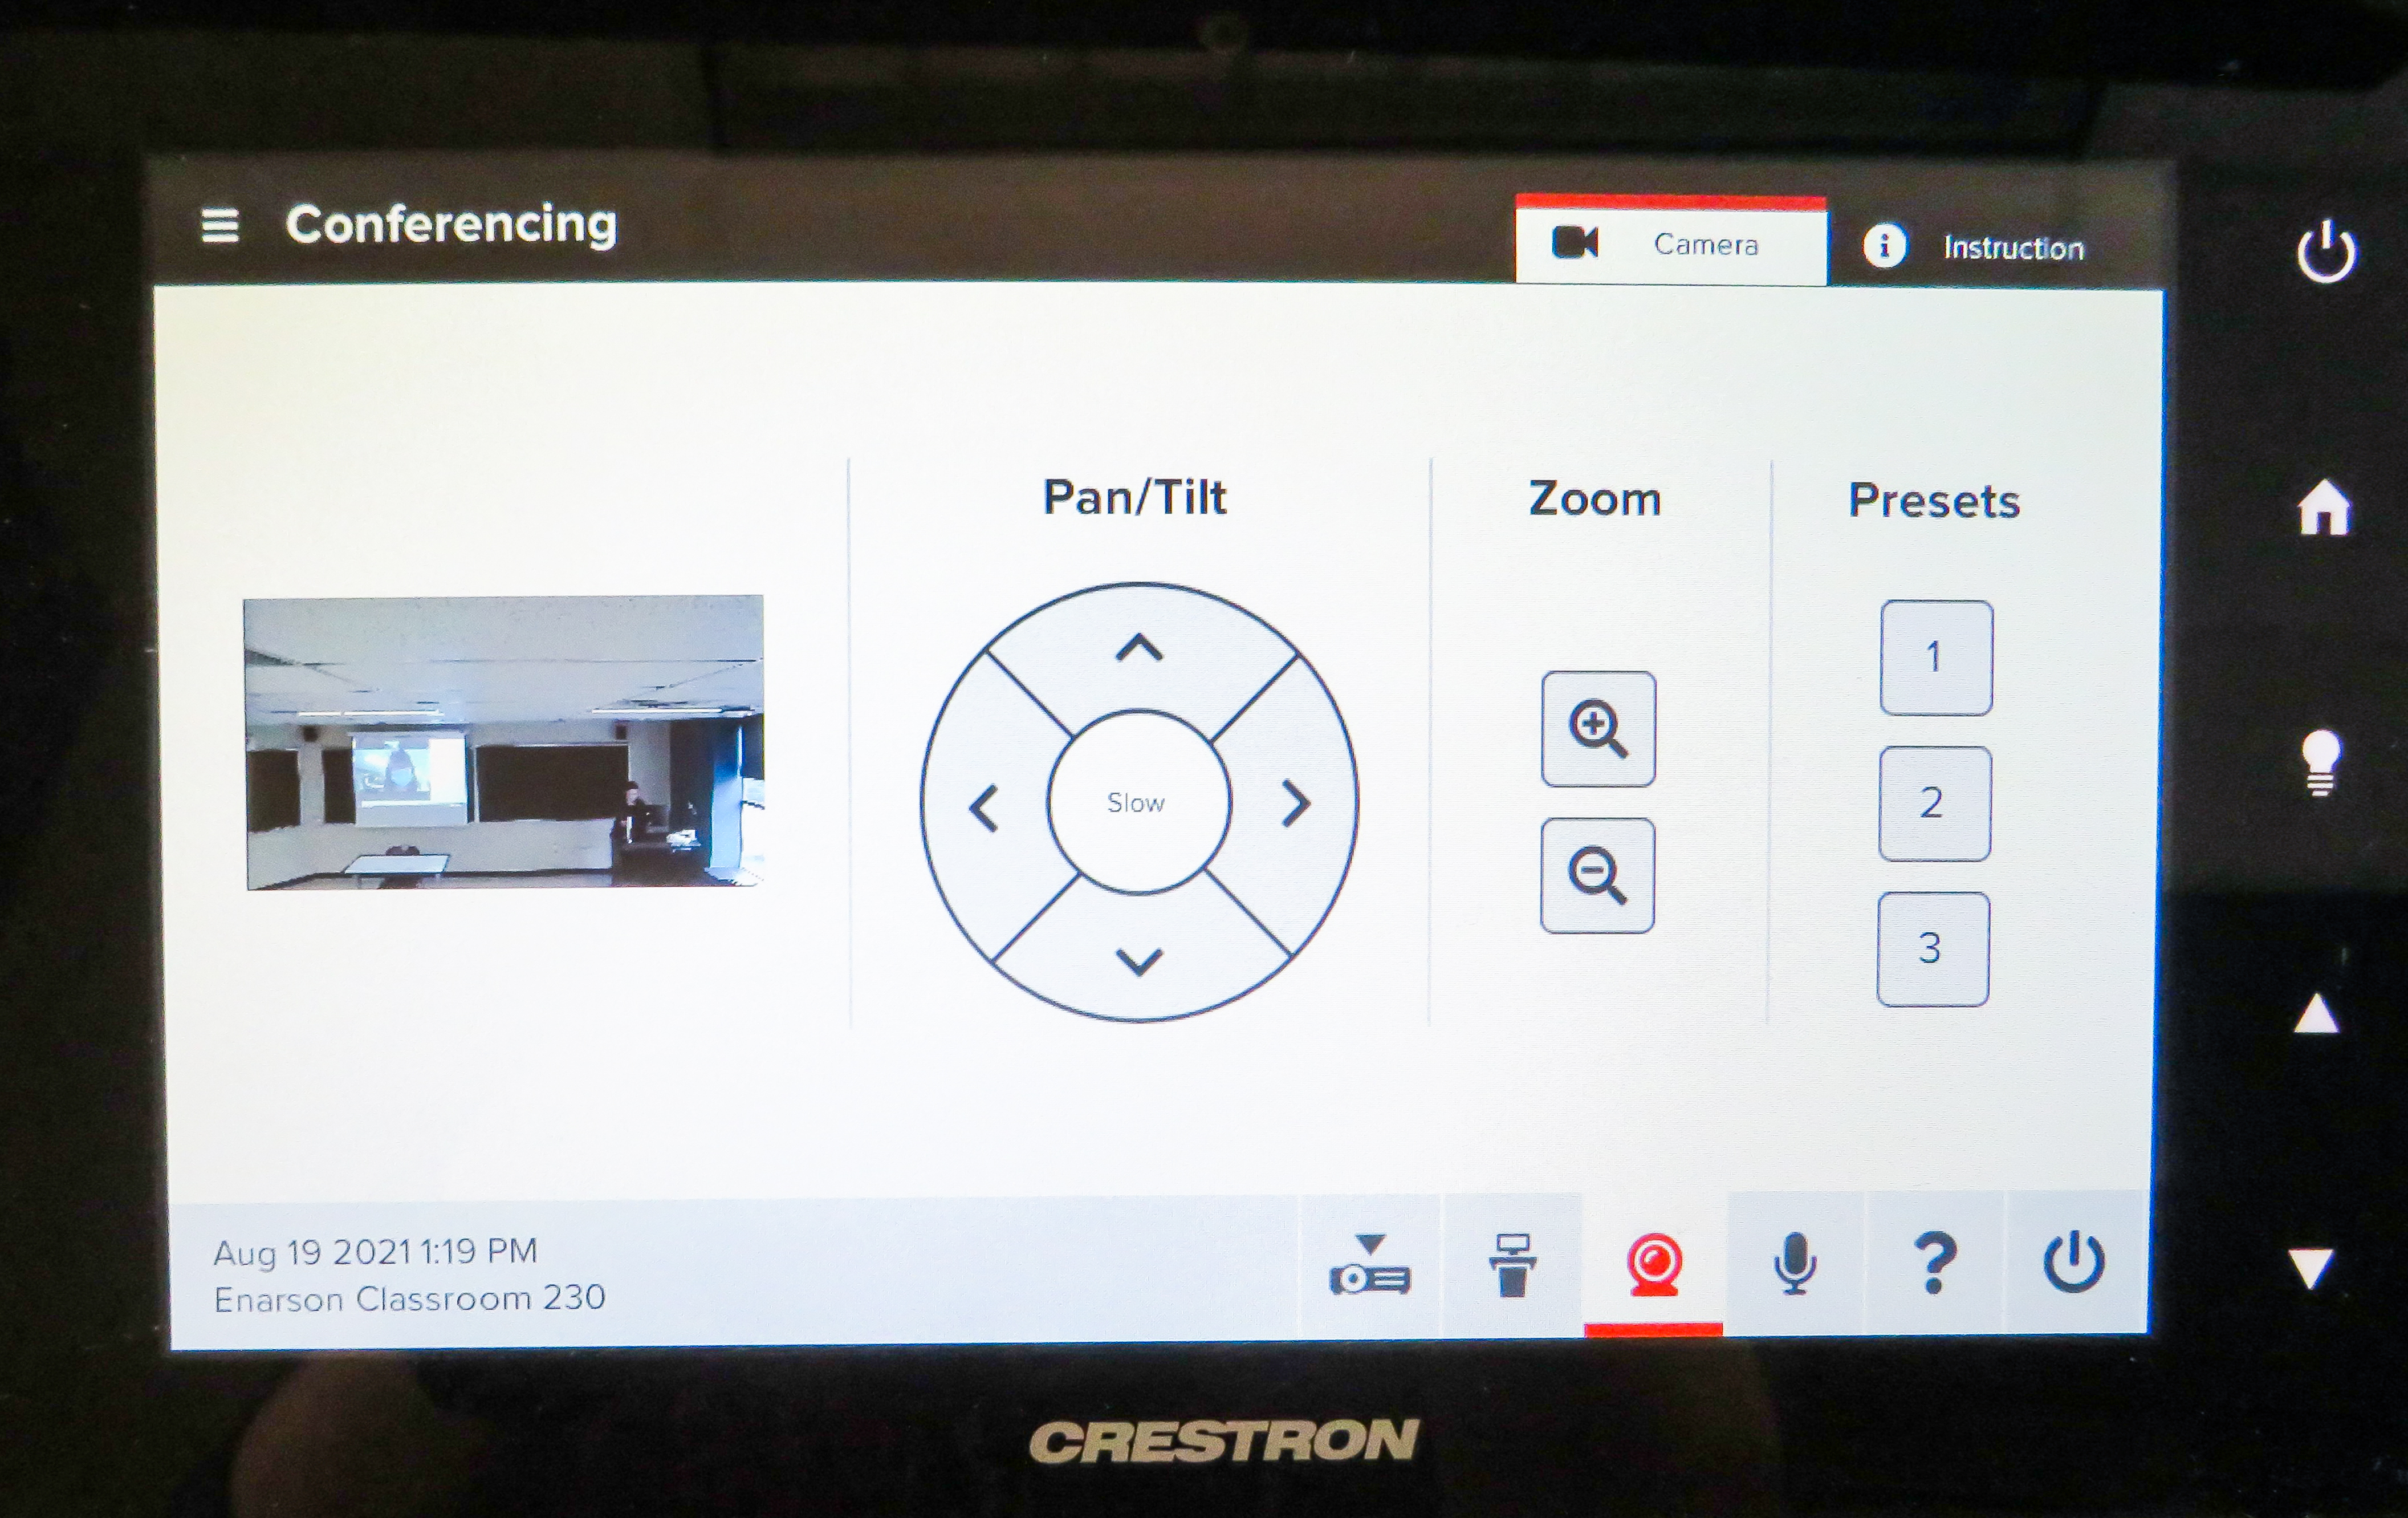
- On the touch screen, tap the camera icon.
- On the camera settings page, select one of three Presets, or use the Pan/Tilt and Zoom options to adjust the shot manually. The box on the left side of the screen will show a preview of what the camera is displaying.
The presets are as follows:
- Wide shot of the entire front of the classroom, including writing surfaces
- Medium shot, which is still wide but may not include projection screens
- Close shot of podium area
Annotating and sharing materials
You have several options for sharing course materials, lecture notes, and annotations with your students.
In-room whiteboard or chalkboard
If you use the classroom whiteboard, you can adjust the in-room camera so that it is visible on screen. In many rooms, if you wish to have both the whiteboard and projection screen visible this takes up valuable whiteboard space, so another solution may be more helpful for both in-person and remote attendees.
CarmenZoom tools
- Zoom has a whiteboard functionality in the screen sharing options.
- Zoom also includes annotation functionality, allowing you to write on top of a document you are sharing with the Share Screen option.
Document camera
Another option is to use a document camera to project content from a paper or a tablet. This camera can be used to show items such as objects or pre-printed documents, allowing your in-room students to view the item on the projector screen and your remote students to view it as your video feed in Zoom.
To use the document camera:
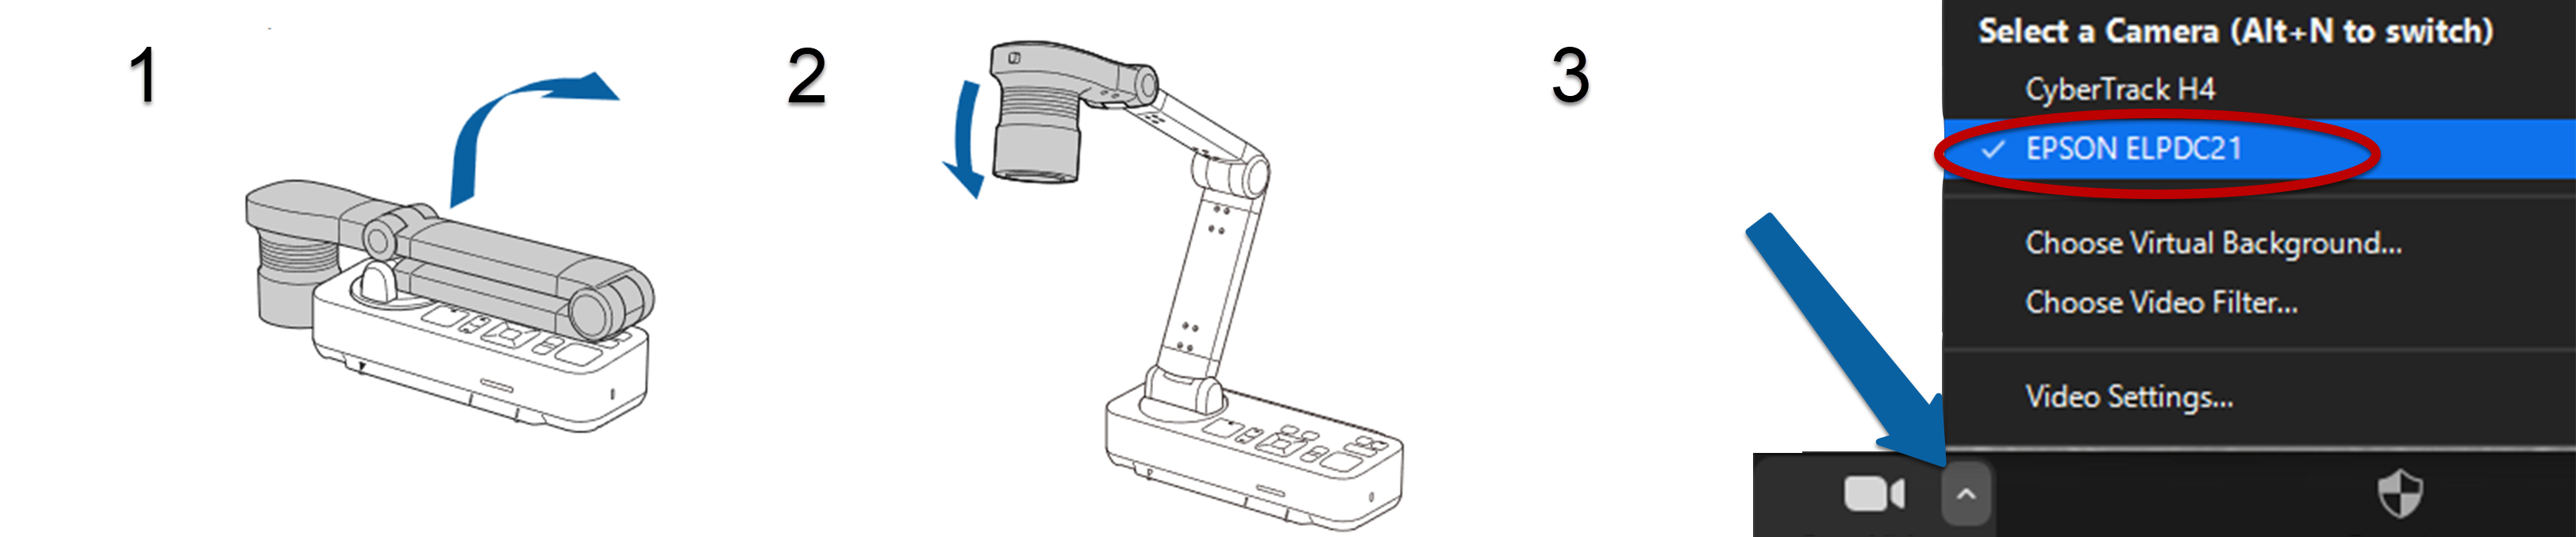
- Power on Document Camera at the podium
- Adjust the arm as necessary
- In CarmenZoom, next to the Video button, click the up arrow and select the document camera.
No matter which option you use, it may be helpful to both in-person and remote students to pin your video in the Zoom meeting so that it remains large enough to comfortably view. To do this, in CarmenZoom, click the three-dot menu on your video window and click Pin.
Using in-room microphones
All classrooms have a podium microphone allowing remote students to hear the instructor. In smaller rooms, this microphone may also capture student voices.
Some larger pool classrooms may have an additional microphone for amplifying voices throughout the physical space for the benefit of students attending in-person. You can look up this information in the classroom search.
- If the classroom is listed as Microphone available in room, a microphone will be provided.
- If the classroom is listed as Wireless Microphone Capable or Wired Microphone Input, you will need to check out a microphone to bring with you to class.