


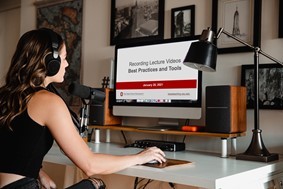
In the ever-evolving landscape of higher education, instructional videos have become powerful tools for engaging students and enhancing learning experiences. Whether you’re a seasoned veteran or a curious novice, the journey of creating impactful videos can be both exhilarating and daunting. Fear not! With the right blend of technology, pedagogy, and creativity, you can transform your teaching and leave a lasting impression on your students.
The Ohio State University offers video recording tools, production methods, and additional resources for educators seeking further exploration. This guide explores these options and the basic steps for creating effective instructional videos from start to finish, including:
- Preparation and recording
- Trimming and editing
- Captioning and sharing
This guide also outlines various types of videos that can be created for your course, such as course intros, instructor bios, weekly announcement videos and feedback, online lectures, and more. Finally, you’ll learn to personalize videos and practice effective communication while recording.
Options for creating instructional videos
Below are three basic options for creating instructional videos, organized from the simplest to the most complex. Consider which option will work best for meeting your students’ needs and fulfilling your instructional goals and objectives. You should also consider what constraints might impact the option you select.
Slideshow with audio
Combining audio and video communication channels can be a great way to engage students and improve their learning experience. This has the lowest entry barrier as the university provides Microsoft 365 and screen recording technology. You may already have presentation slides you've used before, so all you need to do is capture a screen recording of your slides while delivering your presentation verbally.
Slideshow with instructor video
This option incorporates both a video recording of you and a screen recording of your slides. Your visual presence adds a personal touch, enhancing online instructor presence and increasing student engagement. Additionally, students benefit from seeing your facial expressions and gestures as you deliver the content.
Multimedia lecture or presentation
This engaging video type involves a higher level of planning and preparation but offers numerous benefits to your students. Well-produced demonstrations and visual representations can increase student understanding of important or complex concepts. Additionally, students tend to enjoy learning opportunities that deviate from the usual format, which can increase their engagement in course material.
Multimedia videos enable you to provide:
- Demonstrations
- Illustrations
- Dynamic graphic information
- Animations
Putting the extra time and effort into developing media-rich presentations can be the highlight of a course for both you and your students—something they will remember long after taking your class.
Advanced technology and equipment, such as lightboards or virtual whiteboards, can be used to develop multimedia videos. Ohio State provides access to lightboards and recording studios at the Denney Digital Union.
Learn more about virtual whiteboarding tools:
Different types of instructional videos
Your course videos can serve a wide variety of purposes, including introductions, personalized feedback, routine updates, and class-wide lectures. Think flexibly and creatively as you produce instructional multimedia, selecting content that best aligns with your instructional goals and objectives.
Outlined below are some common types of instructional videos that you might consider including in your online courses.
Course intro
In a course intro video, provide students with an overview of the course and share with them what to expect in the course:
- Explain how they’ll be able to apply what they learn in the course in the “real world.”
- Tell them about how your background and research interests intersect with the course topic and materials.
- Consider answering the following questions: What makes you excited about teaching this course? What does learning look like?
Even though you’ll want to share some information about assessments and assignments, you don’t want to get too specific to avoid updating the video every semester.
Instructor bio
Your instructor bio video helps students get to know you. In addition to telling students about your impressive academic biography/career, this video is an ideal place to explain your teaching style, what gets you excited about teaching, and even how you got into teaching in the first place. Keep this video focused on you in general so that you can use it in all the online courses you teach (and even in some in-person ones too!).
Weekly announcements and feedback
Flower Darby’s book, Small Teaching Online, suggests enhancing your online instructor presence with short, informal videos for various purposes, such as weekly announcements or addressing common student questions. She recommends using the learning management system (LMS) video recording feature to send announcements or quick messages to students.
If you’re receiving repetitive emails from students, consider a video announcement to address common questions. If themes have emerged on the week’s discussion board that you’d like to highlight for the whole class, consider making a video announcement where you respond to the discussion board. This can replace individual responses on the discussion board. These videos don’t need to be polished or heavily produced; authenticity is key. Don’t worry about minor mistakes; just pause and resume. This approach helps students see you as a person.
In addition to weekly video announcements, Speedgrader in CarmenCanvas allows you to record your feedback. Research shows students appreciate audio and video feedback more than written feedback because it feels more personal and often includes more explanation and suggestions for improvement (Darby and Lang, 2019; Voelkel and Mello, 2014). You’ll be able to produce, on average, 34 words per minute when recording your spoken feedback compared to only 4 words per minute writing your feedback (Voelkel and Mello, 2014). While the time it takes to use the recording technology may take longer, you will produce more robust feedback for your students, improving their experience in your course.
Online lectures
Online lectures are an effective and immediate way to share your knowledge and expertise with students. You can record, upload, and share lectures regularly to deliver the same kind of didactic instruction commonly found in traditional face-to-face classrooms. Online lectures can be used to set weekly objectives, review module-level learning materials, share professional insights, or introduce upcoming activities and assignments. Additionally, these videos can initiate important conversations about course content that can be further explored in other parts of the LMS such as discussion boards, reflection activities, and synchronous meeting spaces.
In short, these videos can be as dynamic and multifunctional as their intended purpose. Use them to transmit knowledge, ask critical questions, and prompt a wide-ranging conversation with your students. Don’t presume that the conversation initiated by these videos must remain didactic or unidirectional. On the contrary, online lectures can prompt students to begin their own critical inquiries and intellectual discoveries.
Recording online lectures requires significant upfront planning, especially compared to the relative ease and spontaneity of producing weekly video announcements. You should treat the online lecture as you would an in-person lecture and plan accordingly. Regardless of how much preparation you pour into the production of these lectures, you should adopt a conversational tone when speaking to your students. Avoid reading directly from the slides or a script as it can make your delivery seem robotic and disengaging. Research suggests that speaking to your students in a cordial, informal, and conversational manner can bolster their engagement and help you build a stronger rapport with them (Darby, Mayer).
To keep your students engaged, break up the lecture into smaller, more manageable sections, and only use visual aids that directly relate to the course content (Darby). Effective lecture videos should be clear, concise, and thoughtfully constructed, designed in a way that fosters engagement while avoiding the ever-present threat of cognitive overload (Darby). In sum, plan, structure, and deliver your lecture in a manner suitable for online delivery, adopting a presentation style that will leverage its medium to maintain and maximize student engagement (Guo).
While you can record videos in whichever tool you choose, to maintain accessibility and sidestep Carmen’s limited storage capacity, you should host lectures on the university-supported media platform, Mediasite. Using Mediasite to host your lectures will also give you access to numerous features that can help you gauge and increase student engagement including viewing analytics, captions, chapter stops, and quiz questions.
Expert interviews and panel discussions
Expert interviews and panel discussions offer convenient methods for including outside perspectives in your course. By recording these structured conversations with scholars, experts, and professionals within the field, you can expand the breadth, scope, and depth of understanding of a particular course topic.
These videos can also introduce students to a diverse and multidisciplinary array of perspectives, enriching and enhancing their learning experience. From an inclusive teaching standpoint, expert interviews can help promote, recenter, and highlight marginalized perspectives that might not be adequately represented in preexisting course materials.
For lessons that benefit from a larger, more robust cross-section of voices, you might consider recording a panel discussion with a group of peers and experts. These can take the form of structured conversations, debates, or case-based “thought experiments.”
Demonstrations
When teaching students complex tasks or processes that require more hands-on instruction, use demonstration videos to show them step-by-step instructions. These videos can be used to demonstrate the best methods for initiating and completing tasks that students might have difficulty understanding through traditional teaching methods. These videos can illustrate skills that will help students progress in the class or tasks that they will be assigned in their chosen professions. For computer-based tasks and processes like using learning management systems (LMS), third-party platforms, or other software, use screen-share videos with full narration to guide students through each phase of the process. For more physical or hands-on tasks such as lab work or using equipment specific to the field, record yourself performing each stage of the process and narrating your progress.
Virtual tours
Recording virtual tours can be a great way to guide students through on- and off-campus spaces that are directly related to their course content or future professions. Think of these as the online equivalent of in-person “field trips,” with the instructor taking on the role of tour guide. To make the tours engaging and informative, they should be well-structured, curated, and narrated by either the instructor or a guest speaker. You can record with a professional camera or in a stripped-down, DIY fashion using your computer or phone.
Choosing tools for recording your video
There is no one tool or process for creating instructional videos. When considering the right tool for creating your video, think about your comfort level, knowledge, and expertise using available resources and technologies. Additionally, consider the overall purpose of your instructional content and what you’d like to accomplish or include in your video. Some tools are easier to use and master, while others offer more options, higher-quality recordings, and greater flexibility.
Below are three options for recording video content that many instructors find useful and attainable.
CarmenZoom
Most instructors have become familiar with CarmenZoom, so it's often a first choice for recording simple instructional videos. This is one of the easier, more versatile options for producing video content. Simply start a meeting with yourself and select Record.
There are numerous ways to approach your Zoom video lectures, including:
- Direct address: If you wish to record a direct first-person address to your students, select Record from the bottom toolbar and record yourself speaking directly to students.
- Slideshow lectures: If you wish to record narration with a slideshow lecture, select Share Screen.
- Whiteboard lectures: If you wish to record a Zoom whiteboard lecture, from the bottom toolbar select Share Screen and click Whiteboard.
However you approach your video in Zoom, you will need to select a recording option by clicking the More drop-down list of options. We recommend the Record to the Cloud option. This option allows you to record and store your video directly into the Zoom cloud and automatically transcribe cloud recordings. Zoom cloud recordings are automatically deleted after 120 days. The recording can be downloaded, then uploaded to Mediasite for long-term storage, and shared with your students.
Learn more about recording videos in CarmenZoom.
PowerPoint
Instructional videos can be recorded in PowerPoint, either with or without an accompanying video of you delivering the presentation. This method is the lowest barrier to entry and offers a surprising number of options. You can record your entire slide deck in one go or record each slide individually. Once exported to an .mp4 file, you'll have a polished recording. Because Carmen has a limited storage capacity, we recommend hosting your video on the university-supported media platform, Mediasite.
Learn more about recording in PowerPoint.
Mediasite Mosiac
Mediasite Mosaic is a simple tool that allows you to record your desktop’s display, webcam, and microphone to create engaging lecture content. This tool may take more time to master than CarmenZoom or PowerPoint, but it allows for greater versatility and higher quality. You can easily upload lectures to Mediasite manually or create an auto-upload that will seamlessly link any Zoom recordings to your Mediasite account. Once uploaded to Mediasite, you can trim your recordings and utilize the robust backend features of Mediasite including analytics, polls and Q&A, and quizzes.
Learn more about Mediasite Mosaic.
Planning and creating your video
Producing an instructional video involves several steps. Preparation tasks typically account for about half of the total production time. The actual recording takes about one-third of the total time. The remainder involves post-production tasks such as tweaking the recorded video, adding captions, uploading it, and sharing it with your students.
Before you record
Preparation is essential to creating quality instructional videos. The following recommendations will help ensure you are equipped to record your lecture.
Make an outline.
First and foremost, you need a quality outline, script, or storyboard for each lecture recording. Keep your learning outcomes at the forefront as you decide what you will and won't include in your video. Ideally, a video is short (6-9 minutes) and focused on a specific learning outcome. Research shows that as videos get longer than six minutes, student engagement drops off significantly (Brame, 2015). Therefore, it is a good idea to break down longer lectures into smaller chunks to maintain students' interest as they progress through the course content. A brief video can be followed by knowledge checks, reflection questions, discussion, or other activities that engage students and monitor their understanding. You can also embed these engagement opportunities within your video, as explained below.
Create your slides.
Preparing engaging slides, and ensuring they are accessible, is a crucial step in prerecording.
Keep the following suggestions in mind as you make your slides:
- Simple and concise. Don’t overcrowd slides with text. Use keywords or phrases, expanding on each item verbally in your lecture. Organize ideas using bulleted or numbered lists.
- Media-rich. As they say, sometimes a picture is worth a thousand words. Incorporate a variety of media to convey your message. Including relevant photos, graphs, charts, audio, and video will add interest and variety and make your video more engaging for students.
- Accessible to all learners. Use a design template that incorporates white space and has a high-contrast background and font color. Always use the built-in slide layouts in the template for titles and content; this ensures that screen readers will read each slide's elements in a logical order. Learn more about making PowerPoint slides accessible.
Test your setup.
You might be surprised to learn that expensive equipment does not necessarily translate into a quality instructional video. More important is the placement of the microphone and cameras, and, if the lecture includes a video of you, the lighting. Before recording a lecture, test your setup to ensure you have quality sound without any distracting audio feedback. Also, make sure the camera is positioned close enough to capture your facial expressions and pay attention to the background of your video. If there are any distractions or personal items that you don't want to be seen, you can reposition the camera or use a background filter.
Lastly, make sure your lighting doesn't cast harsh shadows on your face; it should be neither too dark nor too bright. Even minor adjustments in lighting can greatly impact the effectiveness of your video.
Recording tips
Keep in mind the recording best practices outlined below to make your instructional videos clear and engaging.
Keep it short.
As noted above, best practices suggest that instructional videos should be no more than 6-9 minutes in length and focused on a manageable amount of content to reduce cognitive overload (Mayer & Moreno, 2003). If you have "nice to know" content or additional examples you'd like to share that aren't integral to your learning outcome(s), consider including this information in a supplemental reading or video.
Speak normally and provide a clear agenda.
Begin each instructional video by providing an explicit agenda for your students, noting the importance of the topic as well as the video's scope and organization. Clearly call out your introduction, transitions, and conclusion. Throughout the recording, use your normal speaking pace as if students are present. Research shows that it's important to vary your vocal and facial expressions and maintain eye contact more than you typically might to heighten student engagement throughout the instructional video (Guo et al., 2014).
Create guided or embedded questions.
Online learners do not have the benefit of asking questions in real-time when they don't understand a concept. Additionally, it can be difficult to gauge whether or not students are comprehending the material without visual cues. To address this, you should include comprehension or knowledge checks at the end of a video or module. Comprehension checks can include:
- Low-stakes quiz questions
- Answering questions about a case or scenario
- Completing a worksheet on a specific topic
To help students test their comprehension during the video, reflection questions or example quiz questions can be built into the slide deck.
Editing your video
Even the most seasoned can find it challenging to record a video without making any mistakes or experiencing moments of silence. Recording instructional videos – even casual or unscripted videos – requires a considerable amount of precision and patience. Therefore, it's natural to encounter mistakes, such as stutters, misstatements, blown takes, and long pauses. Attempting to record a video in one continuous, perfect take is virtually impossible.

If you come across some minor errors while creating your instructional content that does not significantly affect the learning experience, it is okay to leave them in the final product. Though such mistakes may appear obvious or distracting to you, students usually don't notice or care. On the contrary, what we consider “errors” might help humanize you and make your instructional content more engaging (Darby; Guo et al.).
However, if you believe these mistakes will detract from the overall learning experience, you may want to consider using one of the tools outlined below to edit your video. These tools not only allow you to correct mistakes but also offer basic editing features that can enhance the overall quality of your instructional content, including the following:
- Cutting and trimming: Trim out some of the “dead air” at the beginning or end of the recording or cut out any “bad takes” that might have occurred during your recording session.
- Splitting clips: Split long clips or videos into smaller, more discreet segments, exerting better control over the pacing and flow of your material.
- Adding visual elements: Incorporate visuals like slides, images, or intertitles to further inform or clarify your argument. Please make sure that any elements used in your video directly align with the content.
- Controlling audio and video quality: Edit and refine your video and audio, using tools such as noise reduction, equalization, and visual enhancements to make your recordings clearer, bolder, and more polished.
Editing tools
There are several tools you can use to edit your video. Here are some of our recommendations:
CarmenZoom
CarmenZoom has limited editing power but does allow you to trim added space that might be at the beginning or conclusion of your video. As mentioned before, Zoom cloud recordings are automatically deleted after 120 days, so be sure to upload your cloud recordings to Mediasite for long-term storage.
Learn more about editing Zoom cloud recordings.
PowerPoint
Recording your video in PowerPoint also gives you access to the program’s integrated video editing features. These provide a convenient, user-friendly method for trimming, cutting, or formatting your video directly within the presentation software. After recording, you can easily:
- Trim out unwanted content
- Remove audio clips
- Rearrange your slides
- Resize the video itself
You can also delete your audio recordings on individual slides and re-record it. PowerPoint also allows for the insertion of annotations, captions, and transitions. This streamlined process simplifies video editing, making it accessible even to those without an extensive background in video editing.
Learn more about editing in PowerPoint.
Mediasite
Uploading your video to Mediasite gives you access to the platform’s integrated web editor. The web editor provides a wide range of editing options, granting you the opportunity to fully customize your video in an accessible, user-friendly fashion including:
- Easily trim out segments from the beginning, middle, or end of your video
- Add transitions (fades to black, cross dissolves, etc.) to make edits less noticeable or distracting
- Break videos down into briefer, more manageable segments by adding chapter stops or chunking them down into a linear sequence of shorter videos
- Edit preexisting slides, cut them out, or add new ones
Unlike other third-party editing software, Mediasite allows you to edit your video as many times as you would like without re-uploading the entire video multiple times. This is another great and easy-to-master option for those without an extensive background in video editing.
Learn more about using Mediasite’s web editor.
Adobe
Adobe Express includes basic video editing tools and the features of Premiere Rush. Using the video tools in Express allows you to trim, merge, crop, resize, and convert to other file formats. Express is available for free to all Ohio State faculty, staff, and students.
For more advanced features, you can also consider Premiere Pro, available via a Creative Cloud license. Premiere Pro provides a wider selection of tools for conducting post-production work on the video and audio itself. It is perhaps the most versatile and advanced tool available to you but also comes with a steep learning curve. For this reason, you should only consider this option if you have already mastered the basics and want a more dynamic and advanced tool for editing your videos.
Learn more about Adobe options.
Captioning your video
In compliance with the Ohio State Digital Accessibility Policy and Minimum Web Accessibility Standards, all instructional videos must provide captioning for those with an auditory disability. Adding captions will benefit all your students, including those for whom English is a second language, those new to your discipline and its terminology, and those who may simply be watching your lecture in a crowded or loud environment.
Below are recommendations for adding captions by tool:
CarmenZoom
Zoom automatically creates transcripts for your cloud recordings. Transcriptions are downloadable in .vtt format and can create closed captions when uploaded to Mediasite along with your Zoom recording.
Learn more about uploading your CarmenZoom recording and transcriptions to Mediasite.
PowerPoint
PowerPoint does not provide closed captioning of recorded videos. One method of adding closed captioning is to upload your video to YouTube, which will add closed captioning to your video within 24 hours.
Learn more about adding captions using YouTube.
Mediasite
By hosting your video on Mediasite, Ohio State's supported option for storing and sharing instructional videos, you can upload caption files to videos. Additionally, Mediasite is ad-free and offers additional analytic and interactivity options for your instructional videos.
Learn more about captioning your Mediasite presentation.
Uploading and sharing your video
Once you’ve finished recording, editing, and captioning your video, it is time to complete the final steps of this process: uploading and sharing your video with students. Videos should be uploaded to a streaming platform rather than into Carmen itself as videos are quite large and can quickly max out your storage quota. The easiest, most secure, and most accessible option for storing your instructional videos is Mediasite, Ohio State’s supported platform for storing and sharing multimedia content.
If you used Mediasite to record and edit your video, the recording itself should already be available on the platform. However, if you opt to record your video via PowerPoint, CarmenZoom, or another tool, you will need to export or download the finished video as an .mp4 file and upload it to Mediasite. There are many resources available for doing this in CarmenZoom and PowerPoint.
After uploading a video to Medasite, you can share the video with students. Videos should be embedded into a Carmen page via the Mediasite integration in the rich content editor. To maximize accessibility and ensure easy access, you should share each video via a clickable embed with a direct link included somewhere on the page.
Learn more about adding Mediasite presentations to Carmen.
Examples
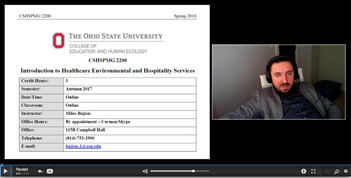
Course Introduction Video
Summary
Instructional videos play a pivotal role in engaging students and enhancing learning experiences in online courses. You can create various types of videos for your course, such as:
- Course intros and instructor bios
- Weekly announcement videos and feedback
- Online lectures
- Expert interviews and panel discussions
- Demonstrations and virtual tours
Whether you have years of experience or are just starting out, the process of making videos that have a significant impact can be exciting yet nerve-wracking. With the right preparation including technology, teaching techniques, and creative skills, you can transform your teaching style and make a lasting impression on your students.
Explore university technology tools that can be used to create, edit, store, and share course videos including:
- CarmenZoom
- PowerPoint
- Mediasite
- Adobe Express and Premiere Pro
Review recommendations for preparation, recording tips, and post-recording tasks including trimming, editing, and adding captions to ensure accessibility for all students.
Explore
Resources
References
Brame, C.J. (2015). Effective educational videos. http://cft.vanderbilt.edu/guides-sub-pages/effective-educational-videos/
Darby, F., & Lang, J.M. (2019). Small Teaching Online: Applying Learning Science in Online Classes. Jossey-Bass.
Guo, P.J., Kim, J., & Rubin, R. (2014, March). How video production affects student engagement: An empirical study of MOOC videos [Paper Presentation]. L@S ’14: Proceedings of the first ACM conference on Learning @ scale conference, Atlanta, Georgia, http://up.csail.mit.edu/other-pubs/las2014-pguo-engagement.pdf
Mayer, R.E. & Moreno, R. (2003). Nine ways to reduce cognitive load in multimedia learning. Educational Psychologist, 38 (1), 43-52. https://www.uky.edu/~gmswan3/544/9_ways_to_reduce_CL.pdf
Voelkel, S., & Mello, L.V. (2014). Audio Feedback — Better Feedback? Bioscience Education, 22(1), 16-30. https://doi.org/10.11120/beej.2014.00022