

When you open a presentation for editing, it opens as a project. A project represents a version of your presentation, accessible only in the Web Editor. If desired, you can create additional projects within a presentation. For example, you may wish to split an hour long presentation into six, ten minute segments.
As you make edits, changes are saved automatically to the project and listed in the revision history.
Once you are completely finished with your edits, you can commit (e.g., "save") your changes to the original presentation, to a new presentation, or to an existing presentation.
Once you commit a change, it takes time for the system to create the new presentation. The process of creating a new presentation, or overwriting a current presentation, is called a "job". For each job, its status and the time it was executed or completed are listed along with a bar showing its progress. A job can have three possible states: completed, working, and failed.
Click Commit Jobs in the upper-right corner of the Mediasite Web Editor to see each job executed and its status.

Commit to Current Presentation
When you commit changes to the current presentation, the web editor saves your content as the subsequent revision.
For example, if you were working on revision 2 of a project, committing changes to the current project will create revision 3. Revision 3 will be your new, saved presentation.
- Login to the MyMediasite Portal.
- Choose the presentation you would like to access. The Summary page opens.
- Click Edit Video.
- Make edits as desired.
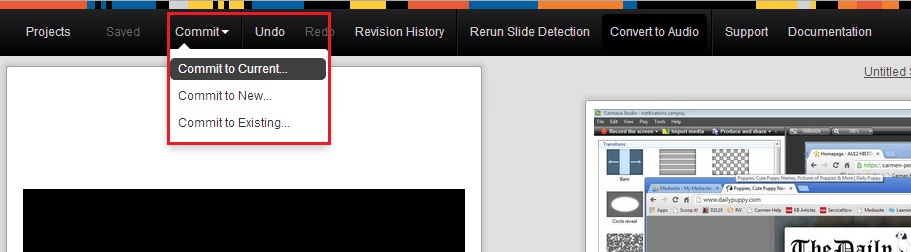
- Click Commit. A drop-down menu appears.
- Select Commit to Current to save your changes to the original presentation.
Image
Commit to New Presentation
When you commit changes to new presentation, a new presentation is created.
- Login to the MyMediasite Portal.
- Choose the presentation you would like to access. The Summary page opens.
- Click Edit Video.
- Make edits as desired.
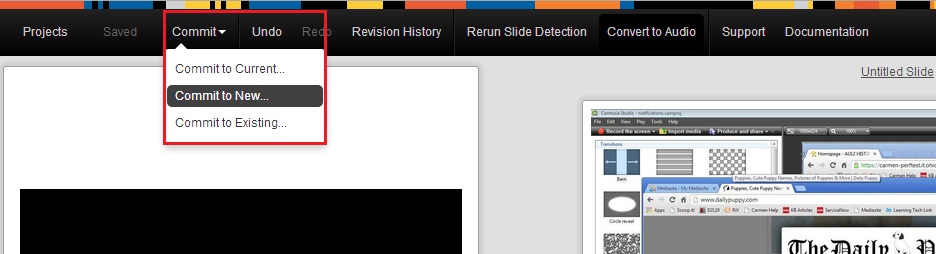
- Click Commit. A drop-down menu appears.
- Select Commit to New to save your changes to a new presentation.
Image
- Enter a title for the new presentation.
Image
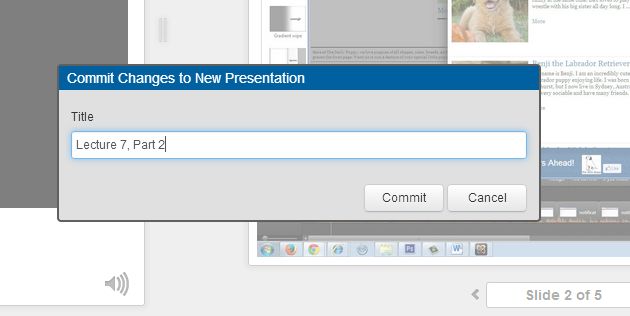
- Click Commit.
- To do additional edits on the newly created presentation, go back to the main Mediasite page and choose the new presentation. The new presentation will have a new project associated with it and will not have the revision history associated with the original presentation's project.
Commit to Existing or Schedule Presentation
When you commit changes to an existing presentation, you are essentially replacing the video component of one presentation with a new video component. All previous revisions to the existing presentation greater than 1 are removed and the project revision is set to 1. Additionally, media from the source presentation is transcoded to match the media type and encoding settings of the target presentation. Note that you can also commit to a scheduled presentation (that is, to a an empty placeholder).
- Login to the MyMediasite Portal.
- Choose the presentation you would like to access. The Summary page opens.
- Click Edit Video.
- Make edits as desired.
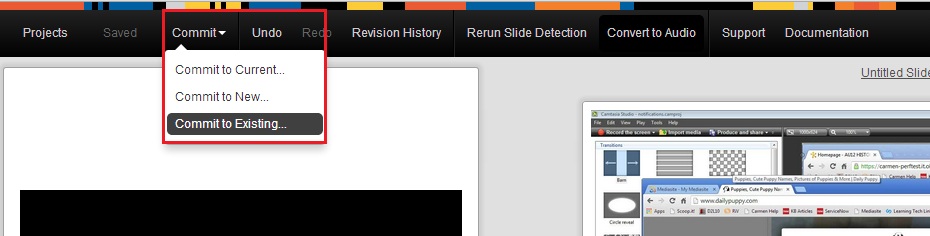
- Click Commit. A drop-down menu appears.
- Select Commit to Existing to save your changes to an existing presentation.
Image
- The Browse area opens. Click the plus sign next to Mediasite Users. Scroll down to find lastname.#. Then, click your OSU email address to view your folders and presentations.
You can only commit to an existing folder to which you have the permissions, though you may see more folders listed.Image
- Select the presentation.
- Click Commit to save changes to the presentation.
- To do additional edits, go back to the main Mediasite page and choose the presentation. The new presentation will have a new project associated with it and will not have the revision history associated with the original presentation's project.